Unit testing is an essential part of any development lifecycle. Writing unit test cases can come in handy when we want to make sure that our code still works as expected even after code changes have been implemented. In Android, we have two types of unit tests that we can write:
- JUnit Test Cases
- Android Instrumentation Test Cases
JUnit test cases are test cases that can run on the JVM. It is preferred to write JUnit test cases as they can run directly on the JVM and are much faster. While writing local unit test cases, if there is any dependency on the Android system, those dependencies can be mocked using a mocking framework like Mockito.
Android Instrumentation test cases, on the other hand, need the Android system to run. They need an actual Android device to run on. They should be used if the test cases rely heavily on the Android system like the Android UI. As they first need to be deployed on an Android device before they can run, they are usually slower than local unit tests.
In this blog, I will talk about how we can write basic Espresso test cases to test the Android UI.
Espresso has 4 main components which are:
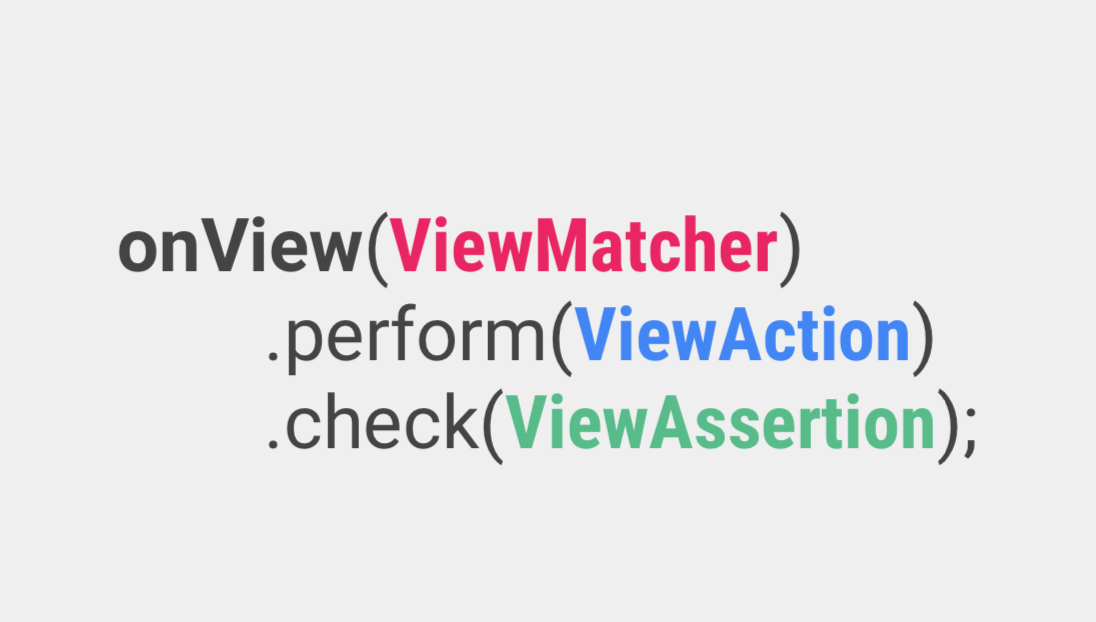
- Espresso – It is the entry point for any interaction with views (using onView() and onData()). It also exposes certain APIs that are not specifically linked with any view, like pressBack().
- ViewMatchers – They are a collection of objects implementing the Matcher <? super View> interface. One or more matchers can be passed to the onView() method to find a view inside the current view’s hierarchy. In case the view that we are trying to match is not present in the view hierarchy, Espresso throws a NoMatchingViewException.
- ViewActions – They are a collection of actions (ViewAction) that can be passed as an argument to the ViewInteraction.perform() method to perform some action on the view, such as click().
- ViewAssertions – They are a collection of assertions (ViewAssertion) that can be passed as an argument to the ViewInteraction.check() method to assert some state of the view. Most commonly used ViewAssertion is the matches assertion, which uses a ViewMatcher to assert the state of the currently selected view.
A complete list of the available ViewMatcher, ViewAction, and ViewAssertion can be found in this Espresso Cheat Sheet.
Now that we know the basic components of Espresso, let’s see how we can integrate Espresso into our Android projects. Let’s start with setting up our test environment.
It is recommended to turn off system animations on the device on which the tests will be run. This should be done in order to avoid test flakiness. Go to Settings -> Developer Options and turn the following 3 animations off:
- Window animation scale
- Transition animation scale
- Animator duration scale
We can override beforeActivityLaunched() to execute any code that should run before our Activity is created and launched.
We can override afterActivityLaunched() to execute any code that should run after our Activity is created and launched but before any test case is executed.
We can override afterActivityFinished() to execute any code that should run after our Activity has finished.
Methods annotated with @Before annotation are executed after the activity is launched and before the test case is executed.
Methods annotated with @After annotation are executed after the test case is executed and before the activity finishes.
ActivityTestRule rule provides functional testing of a single activity, that which is specified in the ActivityTestRule. This activity will be launched before executing every test annotated with the @Test annotation. ActivityTestRule has 3 constructors:
The activityClass parameter indicates the activity class that needs to be launched before every test.
The initialTouchMode parameter indicates whether the activity should be launched in touch mode.
The launchActivity parameter indicates whether the activity should be launched by default before every test case is executed.
Let’s see how we can pass some data to the activity before any test cases are executed. There are two ways in which this can be achieved.
First, we can use the 3rd ActivityTestRule constructor along with the @Before annotation to achieve this. Passing the launchActivity parameter as false indicates that the activity will not be launched by default. The method annotated with the @Before annotation will be executed before every test case
The second way is to implement the ActivityTestRule constructor and override the getActivityIntent method. The getActivityIntent method returns the custom intent that we build and this intent is then available to the activity under test after it’s launched.
We have seen how to setup Espresso and how simple test cases can be written. I hope this article motivates you to implement Espresso in your Android applications for UI testing.