

With over 1.6k active contributors working to make React Native a success, the glitter of a bright framework future has not gone unnoticed by developers looking to make a name in the cross-platform world.
The demand of app development with react native is getting from the developers is not just the doing of the fact that the industry has grown to an extent where it is now comparing Native and React Native modes of development. The demand is also driven by the constant updates that makes the framework advanced.
This demand, though, can only go so far. Ultimately, on a ground level, developers will have to learn their way around the development process. Especially on the front of understanding and avoiding React native app development mistakes which can ruin the users experience and their skills.
We have divided the article into four sections to ease the process of getting accustomed with the errors occured during React Native app development and know what it would take to become a developer that commits minimal mistakes.
Why do Developers Love React Native?
1. Because React Native uses JavaScript

JavaScript is one of the languages which a developer starts their career with. And so they have a very detailed resemblance with the subject matter. The fact that React Native relies heavily on JavaScript brings down the learnability curve to a great extent.
2. They get to build native applications

Even though the developers work on JavaScript, they don’t use web view for rendering React Native components. The one reason why you should choose React Native is because it renders real native elements, giving developers the flexibility to use platform specific components such as activity indicator, which gives very platform a recognizable, native-like* feel.
*It is impossible for a cross-platform developer to build fully native applications. The difference will be extremely visible on the UI and UX front.
3. A straightforward installation process

The installation method must always be direct, i.e. minus any complicated steps. The React Native framework can be installed through the Node Package Manager, which is extremely easy for developers with JavaScript background to follow. And even if you lack the understanding of JS, React Native will prevent you from the hassle of downloading binary from the source.
4. Greater productivity

The key to building app faster lies in the developers’ productivity levels. While the reliability on JavaScript already makes the process easier, it also comes with a live reload feature and the freedom to use any IDE or text editor of their choice.
5. Strong community backing

React Native has gained a lot of popularity ever since its launch in 2015. Developers and businesses from all across the globe and industrial background have chosen to go with React Native at the back of the plethora of benefits it offers.
This high demand has in turn resulted in the creation of a strong widespread community working on adjusting the React Native pros and cons on a daily basis.
6. It is truly cross-platform

When we say React Native is a cross-platform app development framework, we don’t just mean using React Native for mobile app development. Using React Native, developers get to expand their skills to smart TVs, smart watches, Windows devices, and even VR headsets.
Even amidst these and several other un-mentioned benefits of React Native development, there are some challenges that inherently come associated with React Native app development. Challenges that experienced developers have come to accept and work around. To eradicate the challenges, wherever you are located, be it Los Angeles, New York, etc, it is advisable to hire a company with app development with react native in New York to build and develop custom react native apps with the latest features.
The thing to note here is that these challenges that you are going to read next in no way imply that we are against React Native. It simply implies that like any other in the process to be perfect framework, there are some prevalent React Native limitations as well. There are in fact, several considerations to be made when developing React Native apps
Challenges Associated with React Native App Development
1. Dependency on Native app developers

Noting how JavaScript works, developers sometimes have to rely on native developers as well. Especially when you have to put heavy computational operations in the application. These apps type force developers to offload computation to the native part of app, which in turn requires a native developer.
2. Limitations in Abstraction Layer

In order to add more functionality in the React Native apps, an abstraction layer is added on native platform. Abstraction Layer in itself comes with some persistent issues – the issues to avoid in React Native app development – like:
- Identifying bugs which gets encountered in the abstraction layer is extremely difficult.
- High dependency on third-party services and libraries
- Dependency on implementing custom designs
3. Zero support for multiprocessing or parallel threading

React Native comprises of a single Javascript thread because of which developers might observe slow performances when they want to execute any processes in parallel.
4. iOS deployment is particularly difficult

In case of React Native, developers find it particularly annoying when they decide to test their iPhone app on any testing services besides Apple’s Testflight, especially since they will have to deal with issues of obtaining provisioning profiles and necessary certificates.
The process is not very difficult on Android though, as it is very smooth and hassle-free to test and deploy Android apps.
As mentioned before, React Native, like any other framework doesn’t come free of challenges. It ultimately comes down to the experience of the developers. For a newbie or less skilled react native developers these challenges would appear as deal-breakers, while for skilled developers it won’t.
The only difference that stands between a skilled and unskilled React Native developer is the knowledge of mistakes that should be avoided in order to build an error free React Native app.
What makes React Native challenging for some is not just the inherent framework limitations but also the React Native app development mistakes that developers unknowingly commit.
The 7 Common React Native App Development Mistakes
1. Wrong estimation
- Layout for iOS and Android version – Yes there will be a number of reusable components, but there could also be different layouts. In fact, the mere structure of an application page can be different on iOS and Android completely.
- Forms – you should estimate the validation layout as well. When you create app in React Native, you are supposed to write more codes compared to when you create a Hybrid app on suppose Cordova.
- If creating Web app – You should check all the different endpoints which are offered by the backend. And because you will have to handle the logic in the app, it should all be coded correctly. You should understand the database structure, how the entities are connected, etc.
[ALSO READ: Top Local Databases for React Native App Development {A 2020 List} ]
2. Wrong redux store planning

As a developer when we get an innovative project, we focus more on planning the app layout and less on the data handling part of it.
Redux helps in storing the data correctly and managing, debugging app states. When planned right, it can be a powerful tool for managing the app data. When not, it can mess up many things.
Another point to not in case of Redux app development is that is not extremely suited for small projects. Even small changes will ask you to write long lines of codes. So, it’ll be better if you choose to go with it for large scale applications and avoid it when choosing React Native for startups.
3. Not reading external modules’ codes

It is not uncommon for us developers to save time through external modules. It makes things easier and faster, especially since they come with documentation.
But, most often than not, modules break or they might not work as anticipated. This is the reason why developers should read the code and treat the step as one of the React Native best practices. Doing it helps to know what is wrong with the module and even how it can be solved.
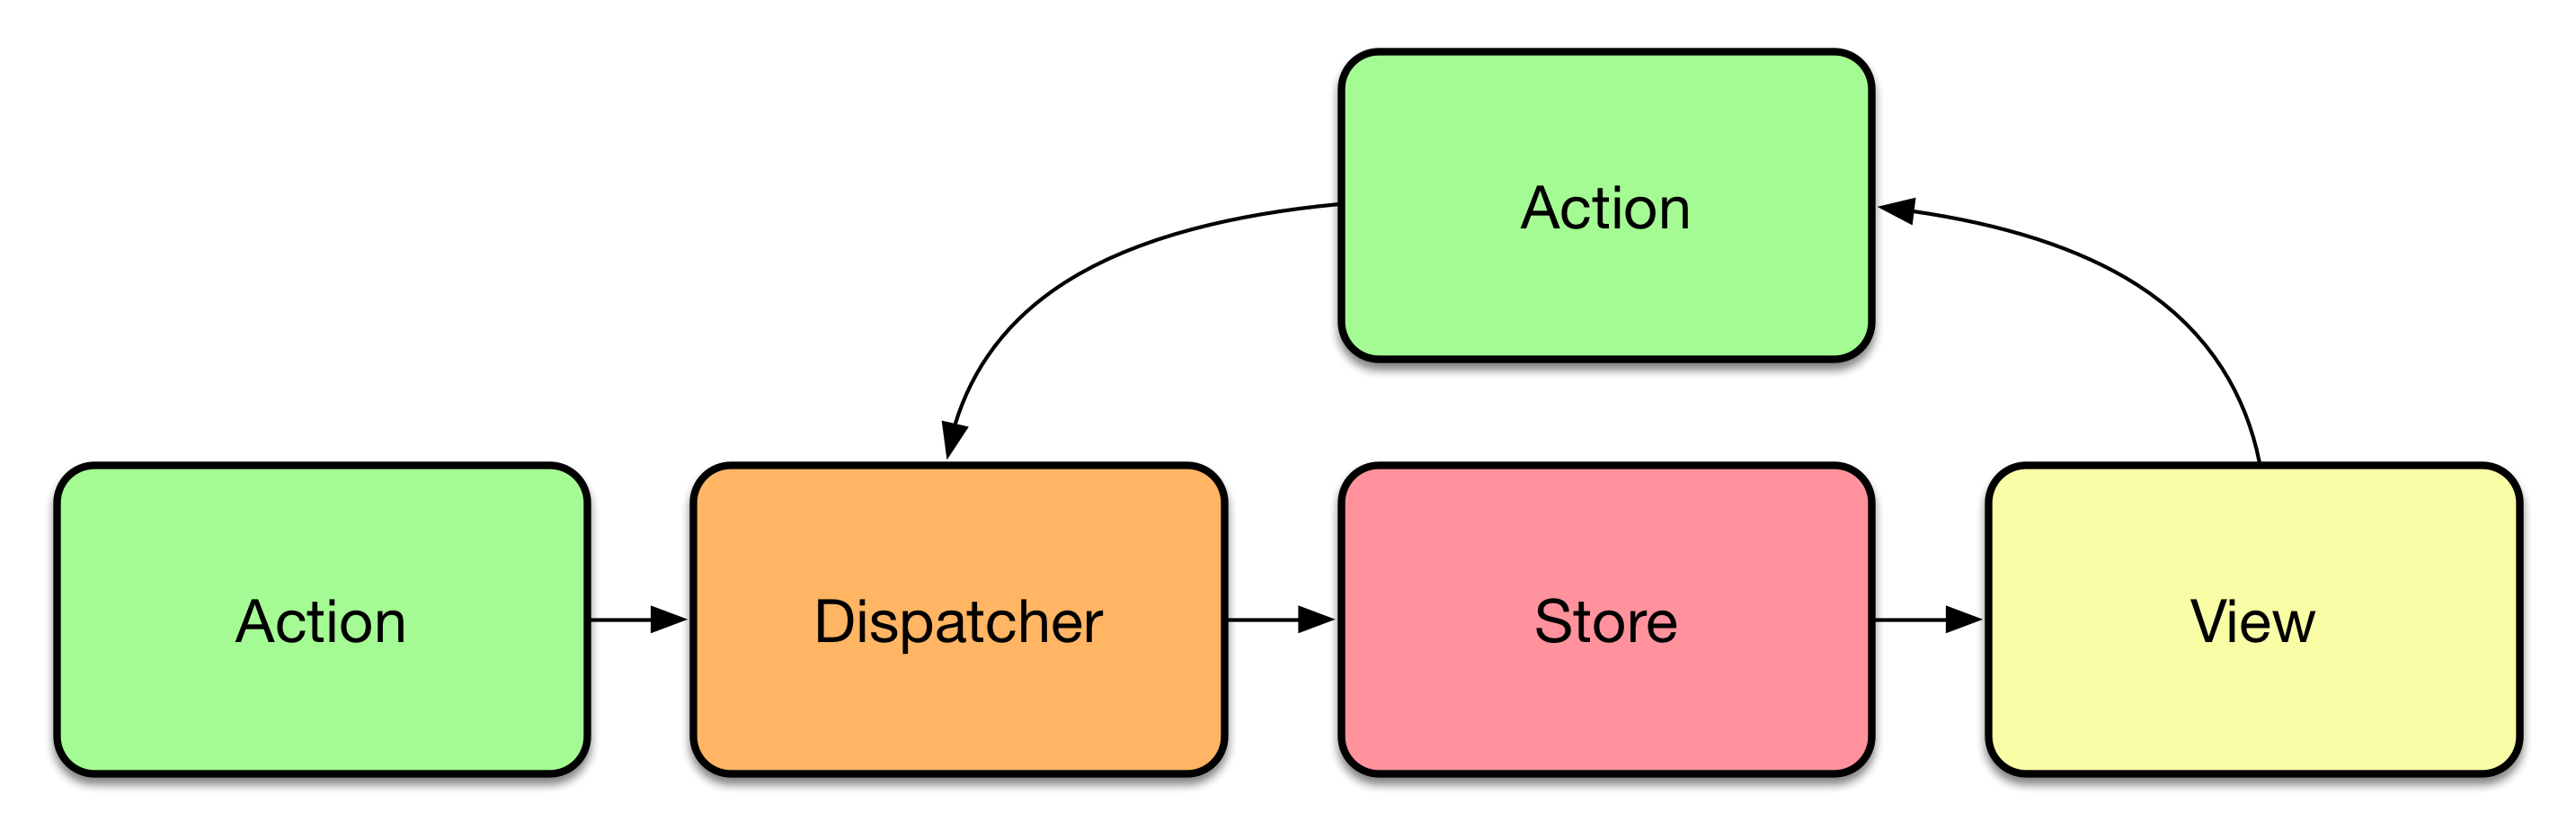
4. Mutation of state inside render function

The image above highlights how the Datastore and View are interconnected. The datastore contains all your data in component and the view is rendered on the basis of state. It then consumes new state from data store and shows it on the screen.
In order to achieve that, React has a setState() function where the new object state is taken and compared to the previous state.
Finally, a new state is added after merger with the previous state and sent to the state datastore.
This cycle is available all throughout the lifetime of a component when you develop application in React Native.
Now, if you mutate the state directly, the lifecycle gets messed up and it corrupts all the previous states. This leads to app behaving abnormally or even crash. This will also result in you losing track of the states across component and will lead to you writing custom code in place of React. Additionally, you’ll end up having an unmanageable code and a heavy app.
5. Left “console.log” statements

Console log statements are extremely handy. They even provide help with debugging the app execution. But what happens when you leave the log statements in the app?
This can turn out to be a serious issue if you keep the render methods and logics inside, especially those which are asynchronous for they can lead to a bottleneck in JavaScript thread. All this ultimately leads to the application becoming slower.
6. Using stateless component for gaining React Native performance

Some developers still think that what was true before React 16 is true even now.
Stateless component basically means that the component does not extend any class. It basically takes the argument as display and props in the DOM. It comes with benefits like –
- Easy testing ability
- Fast implementation
- Does not use state or the local variables
With the time changing, it has today become wiser for developers to use pure component when they create React Native apps. Here’s why –
- Performs shallow compare – This is a special win for complex UI applications as it lowers the render operations. The reason behind it is that it comes with a life cycle method known as shouldComponentUpdate which automatically does shallow comparison and then check if re-render is needed. In case of stateless component, re-render happens when parent component re-renders. But in the case of pure component, re-render only happens when a change is detected in the states or props.
- Performs side effects – Developers can even send AJAX request inside componentDidmount or can perform some other DOM operations.
7. Not optimizing React Native images

Optimizing the images in apps built with React Native should be a high priority task. It helps to resize the images locally and then uploading them to cloud storage like the s3 by server and getting the cdn link which then can be returned using API.
Following this process, helps make the image loading process fast.
While these are only 7, there can be a series of others as well. As a developer, your ultimate aim should be to make as few mistakes as possible.
Let us conclude the article by looking into what it would entail to become a developer who doesn’t commit these React Native app development mistakes.
How to Become a Mistakes-Proof React Native App Developer?
First thing first, there is not even a single developer on planet Earth who doesn’t commit mistakes.
Even developers with 10-15 years of experience commit mistakes. Your aim at the end of this article should not be to become a developers who doesn’t commit mistakes. It should be that you don’t commit the React native app development mistakes mentioned in the article and ones which are generally categorized as common in the mobile app development industry.
There are two ways to do that. Ways to become better React Native app developers –
A. Enroll in courses and keep brushing up your skills

Enrolling in courses at the beginning of your career can be a great starting point on the present and future grounds.
Brushing up on the skill is equally necessary for when you are skilled and have years of experience. What happens is when you expand your career and work on a variety of projects, you most often than not lose sight of the technical understanding that you started with. Thus, it always comes across as a plus point to get back to the basics and revise things from scratch.
B. Associate with a company that focuses on training

This part is more valid for newbie developers compared to their experienced counterparts. When you are just starting your career you should associate yourself with a mid-sized company that has Team Leaders to hand-hold you through the practical application of what you learned on an academic level.
The reason I say mid-sized company is because a small sized company usually operates in a time crunch model, so will be working under the expectation that you will be on your A game since the day one. Considering this, it will always be better if you partner with a mid-size business who will focus on your learning.
Knowing the mistakes that can ruin the users experience can be a good starting point for developers who take their job seriously. And another good starting point would be to get associated with a mobile app development company that understands how mistakes are a part of learning and helps you grow.
If you are searching for a company in app development with react native in NewYork, California, Texas, and so forth, send in your queries to sales@appinventiv.com.
FAQs about React Native App Development Mistakes to Avoid

Q. How do you improve react native performance?
There are multiple ways to improve the performance of your React native application:
- Avoid unnecessary renders
- Use PureComponent instead of Stateless
- Optimize the JSON data
- Lower the app size
Q. Why use Redux with react native?
Redux tool helps in storing and managing the data, debugging app states. When planned right, it can be a powerful tool for managing the app data. Although considered beneficial, Redux is best suited for the development of complex applications as compared to simple apps, for the number of codes are higher.

 But if you understand the flow of Flux then your choice would always be Flux because flow of Flux would be the same even when your application is getting complex. It provides us with additional benefits of maintainability, readability, unidirectional data flow.
