Andriod’s in-app update API

We all use a lot of apps on our devices these days. One for shopping, one for banking, others for ordering food, booking tickets, buying groceries and what not. But the moment the app shows “a new update is pending” notification, we mostly ignore it. As a result, we miss downloading the latest and important feature which can further improve the experience of the app. That’s the story from a user’s end.But on the developer’s side, the story is a bit different. We want all our users to stay updated with the latest version of the app. We imagine users clicking on the “update now” button and start using the new feature almost instantly. But the harsh truth is that only a few users keep their apps updated with new versions.The reason is because most of the times, users don’t bother about opening play store to update their apps. In other words, they don’t have the interest or the time to open and update the app until the app stops doing certain tasks which they want to accomplish.

Google has come up with the solution to this problem. It offers an in-app update feature to update the app without interacting/opening the play store. With this feature, a user can download the latest features while using the app. So let’s dive in to see how we can use this feature.

The in-app update is available in Android Play Core library, that shows prompt to the user for an in-app update. There are two different ways in which we can prompt our users that an update is available.

How to work with Android's in-app update API? - Stack Overflow

Flexible Flow

If the core functionality of the app doesn’t get affected by the released features then you can use the Flexible Update flow. It allows user to download the update in the background. Once downloading is done, user will be asked to restart the app. Doing so will update the app during the restart process. The benefit of using this Flexible flow is that a user can use the app until the download process is finished. So there is no block time while using the app. User can still use the features as the downloading process is being done in the background.

Immediate Flow

If the core functionality of the app is highly dependent on the released features then you can use the Immediate Update flow. In this feature, a dialog will be prompted to ask the user for downloading and installing updates. The user can’t use the app until the downloading, installing and restarting the app.

Checking if an update is available or not – 

For a good user experience, we should always ask the user to update the app only if updates are available. We can check if an update is available or not from the backend.

For that you can use the AppUpdateManager, which will give the AppUpdateInfo object that contains the information about if we need to show the update dialog or not. The updateAvailability method returns these values for the update state :

UNKNOWN

UPDATE_AVAILABLE

UPDATE_IN_PROGRESS

DEVELOPER_TRIGGERED_UPDATE_IN_PROGRESS

Start an update –

Once you have checked for the updates and in case of updates are available then you can use

startUpdateFlowForResults() to update the app.

We will get the following request codes in onActivityResult.

RESULT_CANCELED : This will indicate that user has denied/canceled for the update.

RESULT_OK : This will indicate that user has accepted the update.

RESULT_IN_APP_UPDATE_FAILED : This will indicate that there is some problems occurred during the update.

So now we know how to use in-app update feature to update the app. It’s a good practice to use the Flexible Flow to update the app when there are very few updates and it doesn’t affect the core functionality of your app. However, you have to make a decision on which flow to use as per your requirements and the kind of app you are making. I hope I was clear and concise in my blog and I hope now you have an understanding of how in-app update API work in Android.

Open-Source API Management Platforms for Your Tech Stack

API Management – Manage APIs | Microsoft Azure

Open source APIs have become omnipresent in the world of software and mobile app development.

Right from private solutions to public-facing services apps and partner integrations, it is present everywhere.

They are helping developers in creating apps that caters to diverse set of customer needs. They are transforming the architectural patterns with much sophisticated approach of mobile application development.

Because of this prominent presence, everyone is looking to tune to the best API development guides and use the insights to provide an ultra-advanced and seamless experience to their target audience.

But, is it that simple?

Well, if you thought creating an API is difficult, managing one is worse. What makes it easier though, is using open-source API management platforms.

Let us look into the list of top API management tools and platforms.

15 Open-Source API Management Platforms to Consider in 2020 (& Beyond)

1. Open source API Umbrella

Using API Analytics to Empower the Platform | Nordic APIs |

API Umbrella is one of the top open-source tools considered for managing APIs and microservices. It enables multiple organizations to operate under the same umbrella by empowering varying admin permissions for different domains.

The platform also provides facilities like Rate limiting, API keys, caching, real-time analytics, and availability of an admin web interface.

2. Gravitee.io

GitHub - gravitee-io/gravitee-gateway: Gravitee.io - API Management - OpenSource API Gateway

Gravitee.io is an open-source platform for managing APIs that is flexible and light-weight in nature. It avails out-of-the-box features such as Rate limiting, IP filtering, Cross-origin resource sharing, plug-and-play options, developer portal with OAuth2 and JSON web tokens policies, load balancing, and more.

However, the keynote feature of this API management tool is its ability to build fine-grained reports to comprehend the usage data of your APIs.

3. APIman.io

Review of Red Hat's Apiman Open Source API Management | Nordic APIs |

Introduced by Red Hat, APIman.io is one of the top API management platforms to consider while choosing the best technology stack for your app.

The platform, easily available in the GitHub repository, gives ample opportunities to developers in the backend development phase. This includes:-

  • Quick Runtimes,
  • Policy-based governance with a detachable policy engine,
  • Asynchronous capability,
  • Enhanced billing and analytics options,
  • Availability of a REST API for management,
  • Rate limiting, and much more.

4. WSO2 API Manager

Custom Throttling Policies with WSO2 API Manager | by Sumudu Sahan Weerasuriya | Medium

WSO2 API Manager is a full lifecycle API management platform that can run anywhere and anytime. It enables developers to enjoy the possibility of API distribution and deployment on both on-premise and private clouds.

Apart from this, it brings various other opportunities on board. A few of which are:-

  • Higher Customization,
  • Ease of governing policies,
  • Possibility of Designing and Prototyping for SOAP or RESTful APIs,
  • Better access control and monetization facilities, etc.

5. Kong Enterprise

Welcome Kong Inc. | Introducing Kong Enterprise Edition

Kong is a widely-adopted open-source microservice API tool that enables developers to manage everything quickly, easily, and securely. Its Enterprise Edition comes loaded with features and functionalities, such as:-

  • Availability of open-source plugins,
  • Ease of One-Click operations,
  • Common Language Infrastructure Capability,
  • Great Visualization for Monitoring,
  • Regular software Health Checks,
  • Introspection of OAuth2.0, and
  • Wider Community Support.

6. Tyk.io

Written in the Go programming language, Tyk.io is also a recognized open source API gateway to watch out for in 2020.

Tyk in 2021 - Reviews, Features, Pricing, Comparison - PAT RESEARCH: B2B Reviews, Buying Guides & Best Practices

It comes with a developer portal, detailed documentation, a dashboard for API analytics, rate-limiting for APIs, authentication, and various other such specifications that helps organizations focus on microservices environments and containerization.

However, its commercial-based services are available for paid versions only.

7. Fusio

Fusio Project, Awesome 3 in 1 Open Source API Management Platform - PHP Magazine Network

Fusio is another open source API management tool that lets developers create and maintain REST APIs from different data types. It comes with efficient lifecycle management features like backend dashboard for admin control, detailed documentation, JSON validation for incoming requests, and scope handling to meet user permissions.

What’s more, this APIM platform automatically generate OAI and RAML requirements and create a customized client SDK as per the defined schema.

8. Apigility

Apigility - Reviews, Pros & Cons | Companies using Apigility

Designed and maintained by Zend framework, Apigility is the next open-source framework to consider for API management.

The platform encourages established mobile app development companies to create and exhibit JSON representations for their codes. It also provides them with different versioning options, along with an ease of authentication with OAuth2 and documentation to embrace the API Blueprint.
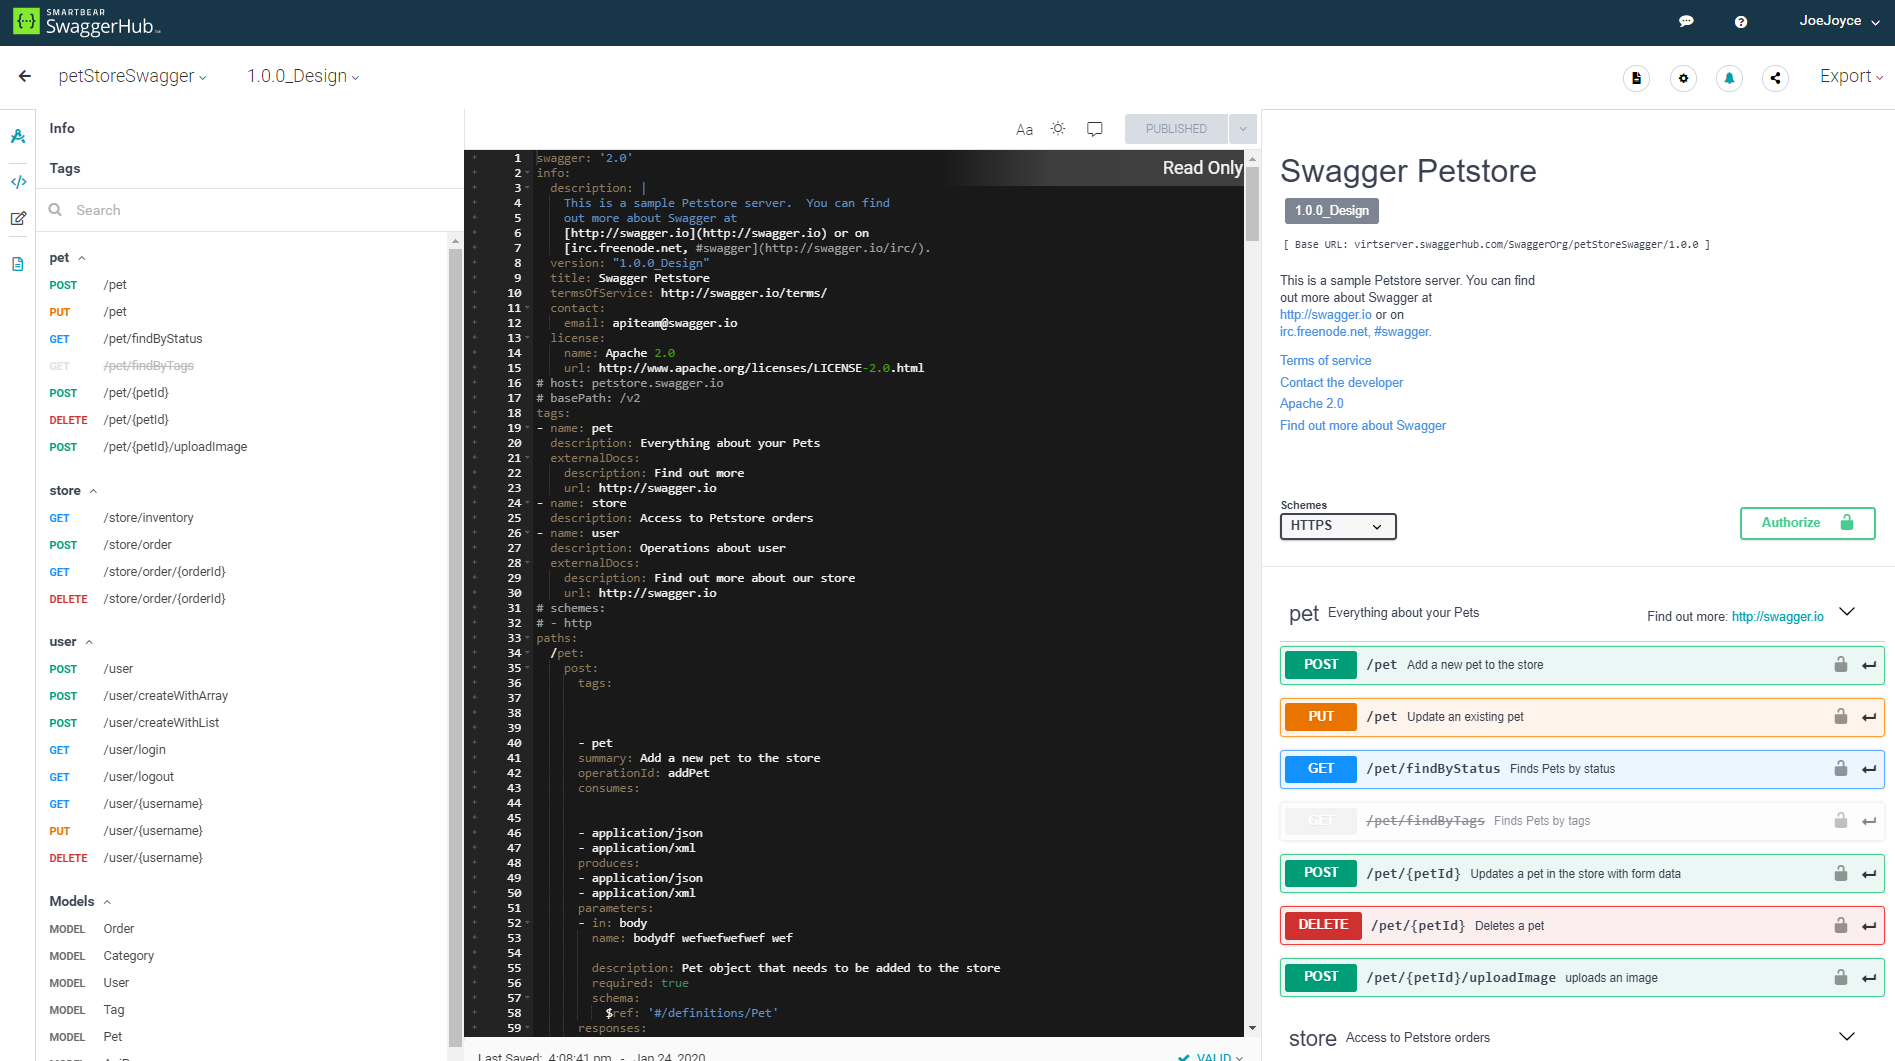
9. SwaggerHub

Considered by 40+ organizations for managing APIs, SwaggerHub is also one of the best open-source API management tools to rely on.

The platform renders a wide range of options to the designers and developers in the backend development domain. It provides them a robust and intuitive editor that delivers higher efficiency and speed while preserving design consistency.

SwaggerHub | API Design and Documentation with OpenAPI

Also, it avails the opportunity of smart error feedback, syntax autocompletion, and availability of multiple style validators.

10. API Axle

Top 15 Open-Source API Management Tools | Appinventiv

Backed by Exicon, API Axle is another open-source, simple and lightweight proxy that provides development agencies with ample benefits like:-

  • Real-time analytics
  • Robust Authentication,
  • Logging of API traffic for statistics and reporting,
  • Ease of creating and managing API keys, and
  • Support for REST API design and use of Go, PHP, and Node.js libraries.

11. IBM Bluemix API

IBM Bluemix Overview

This API management tool enables developers to use more than 200 software and middleware patterns to build portable and compatible apps for the hybrid cloud. It also offers various pre-built services and a robust mechanism for regulating API access, governing multiple API versions, maintaining rate limits, and keeping a track of performance metrics and analytics of every API involved.

12. Repose

Repose

Repose is yet open-source RESTful middleware platform that plays a pivotal role in the changing anatomy of API market. The platform provides organizations with various API processing facilities, including authentication, API validation, rate limiting, and HTTP Request logging.

This API management platform works with an aim to provide downstream services for trusting incoming requests when well-formed and validated. And, it is highly extensible and scalable in nature, which means developers can easily employ it as per the growing demands and requirements.

13. SnapLogic Enterprise Integration Cloud

Integration Cloud Service, Integration Requirements - SnapLogic

SnapLogic is an impressive Integration Platform as a Service (iPaaS) tool that helps organizations in acquiring, sustaining, and growing their customer base. The characteristics that make this possible are:-

  • It is fast, multi-point, and come with the option to flexibly address both batch-oriented and real-time app data integration needs.
  • It has a scalable architecture that operates like web servers, but also provide an option to embrace versatility.
  • It also comes with innovative data flow solutions that encourage organizations to add reputed SaaS applications like SugarCRM and Salesforce into their traditional processes.

14. DreamFactory

DreamFactory 4.4 Released - API Blog: Everything You Need to Know

DreamFactory API Management platform is also one of the best free and open-source tools to consider for your next project. And the set of reasons behind its popularity are:-

  • It gives developers an escape from hand-coding APIs for mobile app development. It enables them to integrate any SQL/NoSQL database, external HTTP/SOAP service, or file storage system into DreamFactory environment, and get a comprehensive, flexible, fully documented, and ready-to-use REST API automatically.
  • The platform also provides a detailed REST API for SQL databases, in addition to access to API parameters for pagination, complex filters, virtual foreign keys, related table joins, and more.
  • Another distinct feature of DreamFactory API Management platform is that it instantly converts the JSON request into SOAP, and vice versa.
  • Also, this platform avails highly secure experience in the form of ease of User Management, SSO Authentication, CORS, JSON Web Tokens, SAML integration, Role-Based Access Control on API endpoints, OAuth, and LDAP.

15. 3Scale

3scale

Last but not least, 3Scale is a notable addition to this list of API management tools.

Owned by Red Hat, the API management tool lets both small and large enterprises securely manage their APIs effortlessly with features, such as:-

  • It employs a distributed cloud layer that centralizes the API program’s control. That makes it easier to keep control of analytics, accessibility, developer workflows, monetization, etc.
  • Since it hosts on a distributed cloud-hosted layer, it is highly flexible and scalable to use.
  • The OpenShift Integration feature of 3Scale API enables you to run high-performance apps in an automated and contained manner.
  • This full lifecycle API management platform empowers developers to plan, design, apply, publish, manage, analyze, optimize, and retire your APIs anytime to deliver an exceptional experience.
  • It comes with the power to share your organization data, services, and content through the web or mobile applications easily.
  • Above all, the 3scale API management platform provides you an opportunity to instill a wide range of encryption, authentication, and authorization protocols into the development environment. This empowers backend software development services to deliver a highly-secure mobile app experience fit for their target user base.

All the API management tools shared above are open-sourced and are poised to be a beneficial addition to the tech stack. But, to ensure that you choose the best fit for your business app needs, we will be covering a few tips on selecting an API management tool next.

How to Pick the Right Open-Source API Management Platform?

Top 10 API management tools. In this article, we review the features… | by Young App Platform | Young App Platform | Medium

1. Features

When it comes to finding an answer to ‘how do you choose the best API management (APIM) solution’, the foremost factor to consider is the features of API management platforms.

Every open-source API management tool have their specific requirements and implementation limitations. So, performing an API management platform comparison in terms of your technical and non-technical requirements can be really helpful.

2. Deployment Complexity

When it comes to deployment, some gateways require a single node while others run on multiple types of nodes for setting up a database. Besides, some gateways operate with many databases, which can be a complicated thing to manage.

So, focusing upon the deployment complexity can also help you with finding the right API management tool.

3. On-Premise vs Cloud hosted

On-Premise tools, as depicted from the name, are located within the physical premises of a company. One can add more time to the deployment and maintenance process.

But, in the case of Cloud-hosted, the API management tools are located at a virtual location and its services are made available via Cloud computing. They can introduce more latency due to the extra hop and even lower down the availability of your service when the vendor goes down.

So, analyzing the pros and cons of both the options to determine which open-source API management tool to embrace can also a profitable idea.

4. Community Support

Last but not least, having an idea of the type of community support each open-source API management tool is having also helps in choosing the right one. The larger and active a community is, the higher are the chances of receiving updates and solutions to your queries; ultimately resulting in a better experience.

With this, we have gone through the list of 15 best Open-source API management platforms and the approach to find the best one. The next step is to actually put this information into practical solutions, aka, employ an open-source API management tool into your mobile project. Which in turn, means bringing the best backend developers on board.

Kotlin Programming Language now supported in Android

Google has just unveiled in their I/O 2017 conference that Android will officially support Kotlin programming language and got huge applause from the IT world. It is an open source project under Apache 2.0 license and built by JetBrains who earlier built IntelliJ. Google has announced that Kotlin is brilliantly designed, mature and will take android development to the next level as it is fast and fully supported by Java. Using Kotlin in Android development will be more fun.

For Android developers, Kotlin as a “first-class” language, is a chance to use a modern, powerful and mature language. It will help to solve the run-time exceptions and source code verbosity. Kotlin provides the flexibility which means it can be easily introduced into an existing project. Kotlin emits the java bytecode and can call java and vice versa out of the box. “The effortless inter-operation between the two languages” was a large part of Kotlin’s appeal to the Android team.

Covariance, Contravariance & inline function | The Startup

Developers can play around the Kotlin using Android Studio 3.0 and there is no need to install any extra plugin or worry about the compatibility issue. You can open the existing Java file, and then choose the option “Convert Java File to Kotlin File”. Android Studio will then add all required Kotlin dependencies into your project and the equivalent Kotlin code. Isn’t this cool?

Kotlin’s major goal is to be available on multiple platforms. Also, they are pretty much busy on working on native platforms like iOS, IoT, macOS, embedded systems.

As said by Google, some of the apps have already started using Kotlin like Expedia, Flipboard, Pinterest, Square. They are getting very positive feedback.

Kotlin has a lot in common to Java in structure as it’s object oriented and statically typed. It is designed for the problem that actually Java solves.

Some of the cool features of Kotlin

Features of Kotlin - DEV Community

  1. Nullability is a very common problem in Java. Basically having null references in the application can kill it. Kotlin finds the difference between the reference that can hold the null or that can’t, effortlessly.
  2. Switching from Java is easy as there is an option to convert Java files in Kotlin directly from the plugin in Android Studio.
  3. Kotlin is versatile and interoperable with Java as developers can write their own module that will work with Java code. It’s compatible with the existing Java library.
  4. Kotlin’s architecture is written in such a way that one has to write less code; at least 20% less while development, which is fascinating.
  5. A common problem in Android development that causes inefficiency to Java code is extra garbage collection. So Kotlin does a fabulous job to avoid this problem.
  6. The Lean syntax in Kotlin language is very convenient. Kotlin balances terseness and readability in syntax which helps to write the code faster and allows better productivity.
  7. Kotlin also provides Functional programming support with zero-overhead Lambdas.
  8. It imposes no runtime overhead.
  9. Kotlin’s extension functions are helpful in building really clean APIs and solve a bunch of other problems.
  10. The == operator does exactly what the community expects.

To learn more about Kotlin, check out their official website.

GraphQL – API interactions made efficient

APIs have become ubiquitous with the advancement of mobility. All clients need to access data on the server and API’s define a contract to access that data.REST has been a popular way to expose data from a server after SOAP since it was lightweight and simple for clients. However, when the concept of REST was developed, client applications were relatively simple. With more rapid movements towards mobility, the client applications have grown in complexity and so has their data requirements from the server. And, REST APIs have shown to be too inflexible to keep up with the rapidly changing requirements of the clients that access them. And more often than not, it is very difficult to implement a fully REST compliant API. Most of the APIs are somewhat REST.GraphQL - API interactions made efficient | Humble Bits

There are 2 major factors that have been challenging the way API’s are designed:

  1. Increased mobile usage calls for efficient data loading. With REST, you often have to make multiple calls to fetch the complete details of a resource.
  2. Variety of different frontend frameworks and platforms. Each platform has need of different representation of the same data. As a REST API developer, we mostly send all the data and leave it up to the client to ignore the data that is not needed. But this puts a load on the user’s data plan.

How I learned GraphQL is the better REST | Codementor

GraphQL, unlike REST, is a more efficient, flexible and powerful new option. The new API standard was developed and open-sourced by Facebook. It is now maintained by developers and open source community from all over the world.

It was developed to cope with the need for more flexibility and efficiency. It solves many of the shortcomings and inefficiencies that developers experience when interacting with REST APIs.

GraphQL enables declarative data fetching where a client can specify exactly what data they need. Instead of multiple endpoints, which return fixed data structure, there is a single endpoint which returns precise data that the client asked for.

To better understand the difference between GraphQL and the REST, let’s consider a blogging mobile application where we want to show a user’s profile screen with the following details on the screen:

User’s name

User’s All blogs title

User’s followers

Remember how we used to gather data with a REST API? It was typically done by accessing multiple endpoints. In the example, /users/<id> endpoint can be used to fetch the initial user data.

Also, it’s likely to have a /users/<id>/posts endpoint that will return all the posts for a user.

Next, the third endpoint will be /users/<id>/followers that will return a list of followers per user.

This leads to the client sending multiple calls, waiting on all those calls, chaining their responses, and gracefully handling if any one of the calls fails.

This highlights the first problem stated above.

Now coming to the second problem-

In this case, at the first step, we are fetching not only user’s name, which we need, but we are also fetching other data which is not required putting more load on the user’s data plan. Similarly, a lot of additional data is being sent across in other calls. This must be to support other clients like a corresponding web application which displays more information as the real estate available increases.

A possible solution within REST realm to solve the above problems would be that you could design your API in a way that exposes the data that is required by this particular profile page. But this is, again, not an optimal approach.

Why, you ask? Especially in today’s times, you want to be able to iterate quickly on your designs and experiment with different features. If you have to tweak your API every time you change your designs on the front end, you are not able to move fast. And keep in mind the versioning you would have to handle in your APIs to keep serving previous versions of your application. And you are in a mess.

Another elegant solution

In GraphQL on the other hand, you’d simply send a single query to the GraphQL server that includes the concrete data requirements. The server then responds with a JSON object where these requirements are fulfilled.

Here only a single request is sent to the server with the query in the request’s body with the exact data requirements and it will return the exact data needed by the application.

This solves our problems of over and under fetching.

I am sure many of you must have had this question in your mind-

An iOS app is so different from an Android app and miles apart from even the web app. How would we return different data for each client?

If I didn’t know about Graph QL, my solution would be either of 2:

  • Let’s send all data required by either of apps and leave it on the application to parse as per their requirement. Over-fetching.
  • Let’s create different endpoints or get platform information from the client in request header and return application specific data. On your path to maintainability issues.

GraphQL solves this problem by giving the power to clients to write their own queries to get data that they need. It’s generous that way- always taking the smallest possible request. Whereas, REST generally defaults to the fullest.

Some of the advantages of GraphQL are-

Typed schema

How many time has it happened that the API does not return data in the correct data type? Numbers and booleans are wrapped as a string. And then you debug it to find out the correct data type. This is because REST API contract only defines the data and not the types for that data.

In contrast, GraphQL uses a strong type system to define the capabilities of an API. All the types that are exposed in an API are written down in a schema using the GraphQL Schema Definition Language (SDL). This schema serves as the contract between the client and the server to define how a client can access the data.

GraphQL is a Query Language first

REST APIs are often created initially simple, then slowly more and more query language-like features are tacked on over time.

The most reasonable way to provide arguments for queries in REST is to shove them in the query string. Maybe a ?status=active to filter by status, then probably sort=created, but a client needs sort direction so sort-dir=desc is added. This is all taken care of in GraphQL because it is foremost a query language so you can easily add in query parameters without affecting the readability or creating a chaos of different types of queries.

{

human(id: “1000”) {

name

height(unit: FOOT)

}

}

GraphQL removes “Include vs Endpoint” indecision

Another customization consideration that comes up a lot is when to offer included relationships, and when to use another endpoint. This can be a difficult design choice, as you want your API to be flexible and performant, but includes used past the most trivial uses can be the opposite of that.

You start off with overly simplistic examples like /users?include=comments,posts but end up on /trips?include=driver,passengers,passengers.avatar,passengers.itineraries and worse.

REST would call for a HATEOAS approach, which would need you to make one call to the /trips endpoint, then hit “links”: { “driver”: “https://example.com/drivers/123” }, and again for passengers, and again for child data of each of those passengers.

This is a big win for GraphQL, as forcing the include approach, the GraphQL will be both efficient and consistent.

And now the disadvantages of GraphQL-

REST makes caching easier at all levels

In an endpoint-based API, clients can use HTTP caching to easily avoid re-fetching resources, and for identifying when two resources are the same. The URL in these APIs is a globally unique identifier that the client can leverage to build a cache. In GraphQL, though, there’s no URL-like primitive that provides this globally unique identifier for a given object. However, you can cache your GraphQL results at the front end using Apollo Client and Relay.

GraphQL query complexity

GraphQL doesn’t take away performance bottlenecks when you have to access multiple fields (authors, articles, comments) in one query. Whether the request was made in a RESTful architecture or GraphQL, the varied resources and fields still have to be retrieved from a data source. As a result, problems arise when a client requests too many nested fields at once. Frontend developers are not always aware of the work a server-side application has to perform to retrieve data, so there must be a mechanism like maximum query depths, query complexity weighting, avoiding recursion, or persistent queries for stopping inefficient requests from the other side.

So to conclude, GraphQL is a powerful technology to make the front end applications easier and more efficient. It has its pros and cons and should be taken into consideration when making important architectural decisions based on the specific use cases.

Your Guide to API testing: Postman, Newman & Jenkins

API testing is a type of software testing wherein an engineer tests not just the functionality but performance, reliability and security for an application. APIs are tested to examine if the application would work the way it is expected to, as APIs are the core of an application’s functionalities.

What Is API Testing?

API testing during development can reveal issues with API, server, other services, network and more, those which one may not discover or solve easily after deployment.

However, testing APIs is difficult. Instead of just verifying an endpoint’s response, one can have integration tests with Postman to examine and validate the responses. Teams these days may also want to automate running these tests as soon as a deployment is done. One approach we can take is to have our integration tests run every time a developer checks in code to the repo.

Adding this layer of Quality check, can ensure that the existing functionalities still work the way they were expected to, with an additional benefit for the developers to validate that their code is doing exactly what it was intended to.

Tools for API test automation in CI

CI refers to continuous integration. Integration of test scripts and a test tool with the continuous build system where the test scripts can be run along with every new deployment or on a regular basis (daily, weekly or fortnightly)

  1. Postman: Integration tests with Postman.
  2. Newman: Create a PowerShell file that runs these integration tests via command line.
  3. Jenkins: Add a Post Build step in Jenkins to execute the PowerShell script whenever a build is initiated.

How to use Postman with Newman & Jenkins for Continuous Integration


API Selection

I have implemented this procedure in our Project using the GPS APIs, but for instantiating here, let’s take up the following APIs:

Open Weather Map: Free public APIs.

I chose this as it is a free collection of APIs that anyone can subscribe to and have their own API keys to operate with.

Create Integration Tests

For the first test, let’s take up a simple GET request to get Weather by ID. To interact through the APIs, make sure to use the API key received on subscribing to the OWM services.

Steps to First Integration Test

Make an environment on Postman say, ‘Weather Map’ and define the environment variables in it. [Refer ‘Managing environments’].

Add the Prerequisites in the Pre-Req tab to set up the test.

Collections

Like the above API tests, one can have multiple test scripts for multiple endpoints. And these multiple test scripts can be run in sequence to have an end to end test suite. The way to have a test suite is to keep multiple test scripts in a place holder called as a Collection in Postman.

These collections can then further be executed through the collection runner in the tool.

Collection Runner

A collection runner can be used to have a collection of API endpoints with their test scripts at one place and therefore run them one by one in a sequential manner. The user just needs to run the collection just once with all the required test data, test scripts and for as many iterations one may want. The result of the collection run is a test report, comprehensive enough to monitor the performance of the APIs and also to re-try running the failed test scripts.

For elaborate study on Collection Runners, refer Link.

Though the user interface of Postman’s collection runner is good enough, yet, to integrate the system with Jenkins, we need to run our collections via command line. So, a way to run collections via the command line is through Newman.

Newman

Newman is a Node Package Manager (NPM) package that permits us to run and test collections directly from the command line.

Pre-requisites:

  • NodeJS and
  • NPM already installed.

Commands to be run on Windows Powershell

  • node -v [to verify the version of NodeJs installed]
  • npm -v [to verify the version of NPM installed]
  • $npm install -g newman [to install Newman]

Once the required installations are done, one needs to have his collections and Environment exported to JSON files in the local system. These files can then be passed as arguments to Newman.

Steps to get the environment and collections on the local system:

  • Click on the Download and Export button in Postman.
  • Download the collection
  • Download the environment
  • Open command prompt and raise your privileges. This is important for you to execute the script.

Adding Postman Tests to Jenkins

Testing REST APIs with Newman | R-bloggers

We first need to export our Postman files (Environment and Collections) and add them to GIT, along with our Powershell script to run the tests through Jenkins build.

“Add the Postman files to the root of the project.”

Telling Jenkins to run Newman

For this we write a script that calls Newman and passes it the Environment and Collection JSON files.

–  ‘exit $LASTEXITCODE’: On typing this command, you will see the result of the last command. We do this to make sure that on every loop, the Newman command is successful. If any of the tests fail, we have to stop the script and exit 1. It will result in a failed build on Jenkins.

Adding Script to Jenkins

Steps:

  • Login to Jenkins and create a Freestyle Project.
  • Start by configuring this project to pull your repo code from Git.
  • In the General Tab, go to build section

Running the build and monitoring Results

Try running the project and examine the results.

One can make out successful entrance into the powershell script with the statement ‘Inside Powershell script’ in the Jenkins output.

Conclusion

Improving continuous integration utilizing Postman, Newman and Jenkins adds another layer of quality assurance into our development life cycle. While this is a huge step in automation, we need to emphasize on the fact that our test coverage depends on the quality of our test scripts.

error: Content is protected !!