As Clients’ Extended Distributed Team, Here’s How We Run Agile Projects!

A recent report by Computereconomics found that in the 2018/19 period, the application development process has emerged as the one witnessing maximum outsourcing opportunity – with 56% of the organizations around the world outsourcing their development requirements.
How We Work As Our Clients' Extended Distributed Team

The reason behind this heightened demand for outsourcing the mobile app development needs has been the same as always – Lower cost than what would have to be shelled out if employing own country developers, allowing greater focus on the main business, and better service quality.

However, even with outsourcing taking a central place in the application development industry, we have found that there are some common concerns that the clients show when they plan to outsource their software development project outside their geographical nation.

In this article, we will look into how Appinventiv works with offshore clients using the distributed agile development cycle allowing a more connected working process with aligned risk and remuneration model across all.

But before we get on to the part where we tell how we operate as the distributed team of our clients and work so seamlessly that we become their extended in-house tech team, it is important to know what Distributed Agile Team even means.

How To Manage Distributed Teams With Agile Project Management

What Do We Mean by Distributed Agile Team 

A distributed team is a concept used to explain the event where two or more team function across multiple geographical locations instead of one office space or even two office spaces in one city. The distributed agile team relies on digital technologies to interact seamlessly and work together toward the same goal – Timely project delivery.

Why do Businesses Invest in a Mobile App Development Distributed Team?

There are a number of reasons that drive businesses to invest in distributed teams, reasons ranging from:

  1.  The scarcity of skilled developers in their nation
  2.  The need to test the market before an investment is made towards team buildup
  3.  To avail the benefit of the flexible team which can be increased at the time of scaling the app and dissolved when the need ends.

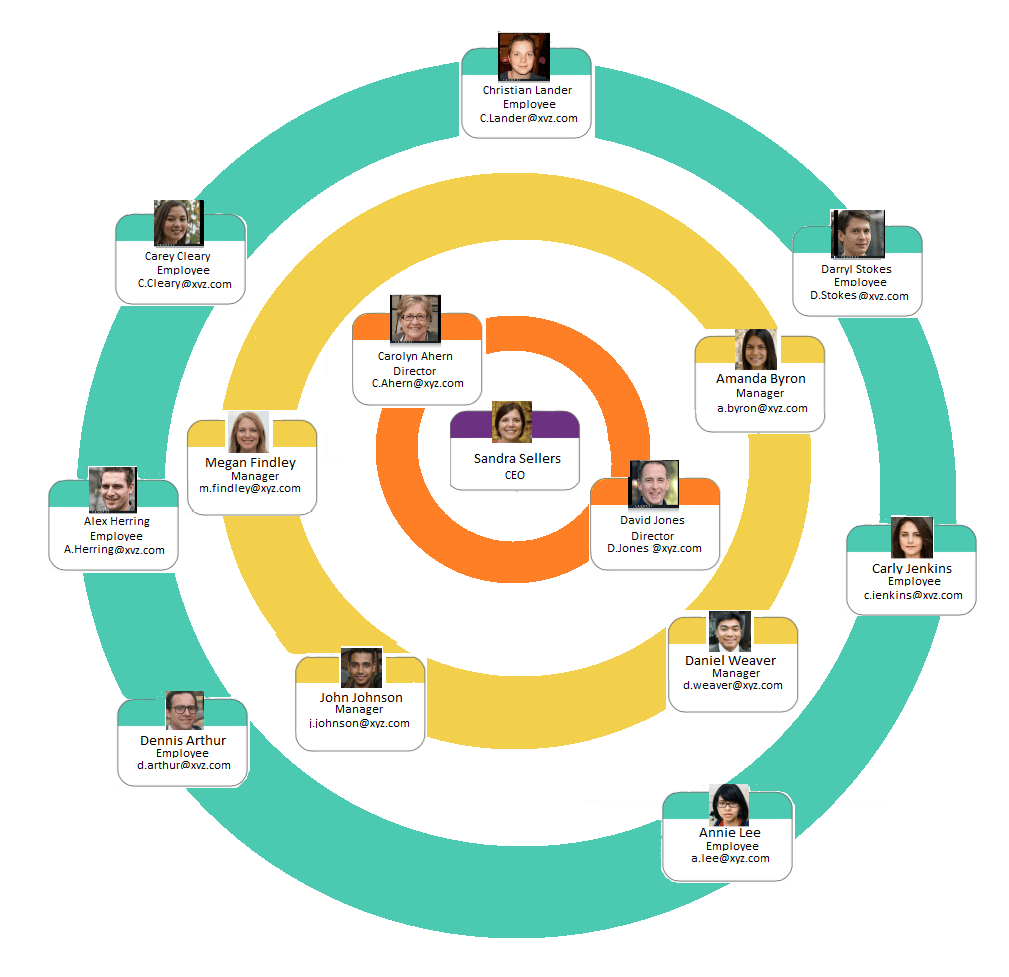
With the definition and the need now attended to, let us now look at how Appinventiv team works as a distributed team of our clients. But before we jump there, let us quickly look at what our typical distributed agile team structure looks like –

Appinventiv Approach to Distributed Agile Development 

Many a time we get a project where the requirement entails us to work in close connection with the clients’ FTEs. In such instances, it becomes very important that we don’t let the distance in thousand miles come between work and that we are able to make changes and take action on developmental process in real time.

How we ensure timely delivery without zero scopes of communication lag and misunderstanding is a question whose answer lies in Distributed Agile Methodology.

Fit with both small-scale and large-scale businesses, following distributed agile best practices comes in very handy when we have to work alongside a team that is sitting in some other geographical location with an absolutely different time zone.

Let us look at the Distributed Agile Development Method we apply in our mobile app development process.

Reasons Why We Trust Agile For Our App Development Process

After we have introduced all the team members with each other and have collaborated the project management software, the actual work starts.

We formulate the process of daily agile scrum methodology. While in its traditional sense, Scrum requires face to face standup meeting of 15 mins where every participant shares the status of their tasks and informs the team of the tasks they will be taking up next, it is nearly impossible to follow the same process when half of the team is sitting in some other geographical nation in some other time zone.

What we do to keep the essence of face to face interaction alive in the scrum, is we hold a video call on one decided time, which is suited for everyone in the team working on the project. With the help of screen sharing our Agile Scrum Master runs through virtual sprint backlog with the help of tools like Trello or Jira, enabling every team member to give an update on where the project is headed.

What we have experienced is that it is very important to give all the team members an access to a task tracking platform that is easily accessible and updatable. We also emphasize using a communication platform like Skype or Slack for everyone to share updates or ask their doubts between the two scrum time periods.

Another approach that we follow for daily agile and scrum process is that for every different scrum, we appoint one scrum master. So, every individual teamwork as a separate scrum team with a scrum master and product owner – A process which is also known as Scrum of Scrums.

In this, all the scrum representatives provide an answer to the following questions in the scrum –

  • The work that team has completed since last Scrum of Scrums
  • The work team is planning to do before the next Scrum of Scrums meeting
  • The present blocker that the team is facing
  • The blocker that can lead to another Scrum team.

The method enables all the main individuals working on the project to interact with each other directly, something that always results in dedication from the initiation stage to launch period. This ensures an open, clear, and transparent communication between all the teams, where everyone is given a voice. The process apart from scrum of scrums is the same as what we follow under the typical Agile methodology. But the mere fact that the distance between our team and our clients’ team is miles apart and yet we have to work as seamlessly as possible, has brought a series of learnings that we have driven by the adoption of Distributed Agile. Let us look at what those learnings are –

The Learnings That we Drew by Working on Distributed Agile Development Process

1. Creation of Distributed team is about Building a Culture and Not a Process

What defines the success of a project working under the agile for distributed teams approach is not dependent on how well skilled the team members are, but on how well they are able to work together, the sense of ownership with which they work, and ultimately how closely aligned they are with the goal of the project – something that comes with culture and not a process formation.

2.Only SMART Projects Succeed

When a project has to be completed by a team that is not even in the same country let alone office, it is very important that the goals that you have set for the project follow the SMART – Specific, Measurable, Achievable, Realistic, and Time-framed, concept to the t.

3. There is no Alternate to Online Collaboration Tools

No matter how much it costs you, you will have to rely on online collaboration tools that are real-time and have minimal to zero lags. In terms of finalizing the online project management and communication platforms, you can not in anyway cut slack. You will have to ensure that they are technically capable of handling your requirements.

Now that we have seen the learnings that we have drawn from our extensive working experience as a distributed team, it is time to look at some of the challenges that we came across during the process and how we solved them to become a trusted Distributed Agile App Development Company.

Challenges with Distributed Agile Development Approach and How we Solve Them

1. Difference in Culture

Usually distributed agile software development approach ask for working with teams coming from different cultural backgrounds. This difference causes friction because of different values and figure of speech. Our Solution: We work very closely with the client’s team in the initial few days so that we get accustomed to their between the lines and contexts.

2. A Difference in Time Zones

The crux of distributed agile methodology is teams working out of different geographical nations. In a situation like this, the occurrence of a communication gap emerging because of the time difference is very common. Our Solution: We follow the concept of agile for a distributed team to its core. We fix a time when the teams from all the nations are present and active. To achieve full focus and attention, we ask our teammates to change their office timing on the scrum day, so that they are well slept and attentive.

3. Lack of a Common Idea of ‘Big Picture’

Because of a difference in geographical location, working structure, and policies, there can be a discrepancy in the idea of the Big Picture – the end aim of the mobile app. This difference might cause a lack of interest from some team members and a heightened interest from others. Our Solution: A visioning meeting at the start of the project initiation and a  reminder in every scrum, so that everyone is working towards the same goal.

4. An absence of Code Ownership

The absence of collective code ownership means that no one person owns the code, it is owned by the whole team and so when something goes wrong, the blame game starts. Our Solution: We apply a version control system to check who is working on a code and when and the effect of it. This way, there is complete transparency and honesty in the picture.

What Does It Take To Create A Billion-Dollar Application?

App Builder | The Best App Maker for High End Mobile Apps

The world of smartphones is pretty exciting with constant changes in their landscape. With the arrival of a new device every week, the scope of these life-changing devices seems to be never-ending. Along with the evolving changes in smartphones, we’re also bombarded with several applications. Whether you want to book a taxi or purchase a rug, there’s a mobile application available for every purpose.

If you’re a budding entrepreneur with an innovative and developing app idea and are looking to make billions, you’ve surely found a sweet spot. Let’s take a look at the detailed guide to build a billion-dollar application.

How to Build a Billion Dollar App?

1. Building a team and raising funds

Why You Need To Build Your Team Before Raising Money - Brett J. Fox

If you have a revolutionary idea to build next million dollar app that you believe will be loved by millions of people, the first thing you should do is test your great idea for an app by stating it on a paper and getting feedback from the public. Figure out a problem, a solution, and translate it into an application.

Whether you use paper or photoshop, make sure your billion dollar business idea can be easily communicated and explained to others. Once you’ve made a great design, make a prototype out of it. As soon as your app gets into users’ hands, you can start getting feedback.

To start building a team, all you need to do is find people who share the same vision as you and have the required skills to make your dream achievable. Recruitment will be a game-changing task, and you must do everything to get skilled and enjoyable people on board.

Ask your friends, family, and even your enemies to download and use your app – and provide brutally honest feedback. Analyze your targeted audience and brainstorm different routes to reach them and use your application.

2. Capturing the product market

How to Conduct a Market Analysis for Your Business in 4 Steps

As of now, you should have a prototype ready and used by people. If you have a simple business model such as gaming, you may consider releasing the first version of your app startup idea on the app stores. Otherwise, for a complicated model, you need investment for further development.

At this point, the only thing you should care about is achieving a solid product-market fit and making sure people love your app up to an extent where they’re willing to pay for it. Keep developing a reliable user acquisition strategy.

You also need to determine the cost of acquiring a user and how you can make it profitable. The billion dollar app idea that started as a basic model will evolve quickly now, and you need to keep validating it by testing, measuring, and analyzing with users.

Although it may be hard to make an app that people love and pay for, you must keep patience and perseverance. Once you’ve gone through this stage of hardship, the valuation of your app should be on an average near $10 million.

3. Generating revenue streams

Revenue Streams | Business Model Canvas

Now when you’ve achieved product-market fit and have an app ready that users love, your aim should be to keep growing and achieving traction by improving all the aspects of your app and figuring out how to monetize it and generate revenue.

If you have a gaming, eCommerce, or marketplace business model, you’ve already convinced users to pay for your app. All you need to do now is improve the lifetime value of your app by holding and retaining users along with keen increments in your margins.

In addition to providing a satisfying user experience, you also need to work your way to optimize the price points and lower the cost of customer acquisition. Keep adding new features and revenue streams to your app without compromising on usability.

By this time, you should also land your first investor, and finally join the big bulls. This also means you should have at least a million dollars or more in your bank account, depending on your negotiation skills and traction.

4. Scaling like crazy

How one e-commerce giant uses microservices and open source to scale like crazy - TechRepublic

After signing your first investor, you continue gaining great reviews about your app and have a clear process to address user feedback. Your team also continues to grow at an enormous rate, and you may even hit a hundred people or even more.

Moreover, your user base should also be growing steadily and the user-retention strategy should be in place. As you reach this stage, you’ll notice that user acquisition has become predictable and systematic, along with the drowning cost of acquiring new users.

Your company is also becoming increasingly profitable and revenues are growing at an exponential rate. This calls for the need to constantly look for product innovations and introduce more revenue streams in your business.

Talking about the valuation of your app, everything seems to be different and you’ll no longer be treated as a startup. You’re now an established company with a very complex valuation based on your financial performance and uniqueness.

5. The big billions

What Is a Vision Statement and Why Is it Important? | BoardEffect

While you keep making constant progressions in the app and follow the momentum, you also need to have a clearly defined vision for your product with practical and systematic steps to realize it. The core mantra is to keep your users happy and satisfied with your app.

The business model at this point also requires to be tuned constantly, and even small fractional improvements can yield big profits. The valuations will still be complex and you must keep a keen eye on your profits, growth, and products.

How Much Does It Cost To Build An App?

Prior to leaping directly into the cost, first of all else, you need to choose the niche of the application and its features. The prerequisite of the overall population or the demand of the user ought to be profoundly understood, and a thorough thought should be given to respond to various inquiries.

Features and functionality

Features vs. Benefits: Here's the Difference & Why It Matters

Knowing the cost of development is an ideal opportunity to find what features impact the intricacy of the entire application. Execution of certain features can be a lengthy process, while others are moderately short and simple. Based upon the complexity of solutions, mobile app developers need to utilize third-party API or code from the scratch. Less complex solutions, thus, require standard instruments and connect with native features.

Product design

Product Design | Product Design Service | Spark Innovations

Making a special UI design is a complicated process that produces extra cost to your task. The less expensive variation suggests utilizing OS-provided things and building screens of standard components. The quantity of screen is likewise a deciding variable. Thus, cost strategies and models need to be decided before implementing any decision.

Number of platforms

Have You Done These 5 App Store Optimizations?

It is obvious that you need to make a decision on which platform to begin from. Making a decision for the platform is the most significant and difference making character for creating mobile applications.  These platforms take over various programming languages, have diverse SDKs and use distinctive development tools. Thus, the cost varies differently if one has to develop on iOS or Android.

Backend infrastructure

Premium Vector | Back end development concept.

When it comes to mobile app development, backend is normally an OS that provides developers with APIs to have a data trade between an application and a database. To follow user activity and access the performance of your consumer application, it is outfitted with examination. Depending on the quantity of parameters you will track and how detailed and specific the tracking will be, expenses vary.

App administration

Morpholio's Latest Trace App Update Streamlines Construction Administration Design Changes | ArchDaily

The organization board is unquestionably an extremely helpful tool for dealing with application content, customers, and statistics. There are alternatives to adopt existing admin panel formats for your necessities, yet tracking down a good one is an issue. So it makes sense to create a satisfactory board to meet your business prerequisites.

Location and structure of team

How To Create A Small Business Organizational Chart With Examples

The location of your application development team is a crucial factor affecting the product’s last cost. The expense of making an application in the US will contrast from the expense of mobile app development services in Europe or other different areas. If you want, you can opt for companies in your area like mobile app development company in USA if you live in the US or any other area where you reside. But you have to be careful while choosing a company or developer to get quality results.

Summing Up 

Today, billions of people across the world are using smartphones and their applications daily. Moreover, in a few years, the figures will simply multiply themselves, and that’s because technology has never been so accessible and powerful before. People are making the most to develop a billion dollar app and get the best idea to satisfy customers.

Andriod’s in-app update API

We all use a lot of apps on our devices these days. One for shopping, one for banking, others for ordering food, booking tickets, buying groceries and what not. But the moment the app shows “a new update is pending” notification, we mostly ignore it. As a result, we miss downloading the latest and important feature which can further improve the experience of the app. That’s the story from a user’s end.But on the developer’s side, the story is a bit different. We want all our users to stay updated with the latest version of the app. We imagine users clicking on the “update now” button and start using the new feature almost instantly. But the harsh truth is that only a few users keep their apps updated with new versions.The reason is because most of the times, users don’t bother about opening play store to update their apps. In other words, they don’t have the interest or the time to open and update the app until the app stops doing certain tasks which they want to accomplish.

Google has come up with the solution to this problem. It offers an in-app update feature to update the app without interacting/opening the play store. With this feature, a user can download the latest features while using the app. So let’s dive in to see how we can use this feature.

The in-app update is available in Android Play Core library, that shows prompt to the user for an in-app update. There are two different ways in which we can prompt our users that an update is available.

How to work with Android's in-app update API? - Stack Overflow

Flexible Flow

If the core functionality of the app doesn’t get affected by the released features then you can use the Flexible Update flow. It allows user to download the update in the background. Once downloading is done, user will be asked to restart the app. Doing so will update the app during the restart process. The benefit of using this Flexible flow is that a user can use the app until the download process is finished. So there is no block time while using the app. User can still use the features as the downloading process is being done in the background.

Immediate Flow

If the core functionality of the app is highly dependent on the released features then you can use the Immediate Update flow. In this feature, a dialog will be prompted to ask the user for downloading and installing updates. The user can’t use the app until the downloading, installing and restarting the app.

Checking if an update is available or not – 

For a good user experience, we should always ask the user to update the app only if updates are available. We can check if an update is available or not from the backend.

For that you can use the AppUpdateManager, which will give the AppUpdateInfo object that contains the information about if we need to show the update dialog or not. The updateAvailability method returns these values for the update state :

UNKNOWN

UPDATE_AVAILABLE

UPDATE_IN_PROGRESS

DEVELOPER_TRIGGERED_UPDATE_IN_PROGRESS

Start an update –

Once you have checked for the updates and in case of updates are available then you can use

startUpdateFlowForResults() to update the app.

We will get the following request codes in onActivityResult.

RESULT_CANCELED : This will indicate that user has denied/canceled for the update.

RESULT_OK : This will indicate that user has accepted the update.

RESULT_IN_APP_UPDATE_FAILED : This will indicate that there is some problems occurred during the update.

So now we know how to use in-app update feature to update the app. It’s a good practice to use the Flexible Flow to update the app when there are very few updates and it doesn’t affect the core functionality of your app. However, you have to make a decision on which flow to use as per your requirements and the kind of app you are making. I hope I was clear and concise in my blog and I hope now you have an understanding of how in-app update API work in Android.

The Mantra to Mobile App Development Success

Mobile is now everywhere. In today’s reality, we can hardly imagine spending a day without our mobile left at home, so much that it turned into an addiction for many of us: feeling the „phantom vibration“ in our pocket or being anxious when the phone is not with us are just two of the obvious aspects reflecting our relationship to the mobile. From an object that we often forgot at home barely fifteen years ago, it turned into a pocket computer that has replaced many of the daily life objects (photo and video cameras, music player, recorder, calculator, agenda, and everything that a powerful, internet-enabled computer provides). From the moment it became „smart“ with the first iPhone release in 2007, everything has changed and more and more of our lives and daily actions are going through that object. Smartphones and tablets have completely changed the way we live, buy, research, communicate – mobile has basically put the digital world at our fingertips 24/7, wherever we are, freeing us from the desktop-sitting and immobile position. This has also drastically changed our approach to common tasks: we expect to perform them at our convenience, according to our needs: what Forrester calls „the mobile mind-shift“ : it replaced the computer as the first and main interaction for daily tasks. Such mind-shift forced every business to adapt their offers and service, as mobile becomes the front door of their organization. All this led to the development of „mobile-first“ design website in a first time, but more and more businesses decide to develop their own branded app. The mobile market is an incredible opportunity for businesses to interact with their customers and know them better thanks to the app analytics, provided they handle these analytics correctly. Let’s go over the key factors to consider when developing a successful mobile app, and how to manage your analytics with reporting tools.

APP ANALYTICS: A GOLD MINE

Mobile app analytics are multiple: they can be used for analyzing the app performance on various app stores, but also bring a lot of insights about the way the users are interacting with it.

Thanks to app analytics, you know how many people have downloaded your app, on which app store, and if they found it directly browsing the store or via another website or app as referrer. It gives you already basic information to shape and adapt your mobile strategy over time.

You also find usual marketing analytics you would use for your branded website or blog: – the number of impressions (how many times your app icon appeared in the store)
– how effective are your different in-store marketing campaigns
– how effective your app product page is, comparing the number of people reading it to the number of people downloading it
– the average visit time and screen views per visit, evaluating the average session duration and how many “app screens” a user read on your app.
– the app retention, measuring how many users come back to your app after their first visit.

Just like in Google Analytics, you can also learn about the demographics of your users:
– who they are
– their age
– their gender
– where they live
– which language they speak.

That will help you define more specifically your target audience and adjust your product and content to their interests and needs.

With mobile app analytics, you also learn a lot about the users’ behavior and habits within your application: these are referred to as in-app analytics. They gather data on:
– how often the users are opening your app,
– how long they engage with it
– on which device they are doing so (the type -mobile or tablet-, the manufacturer, the operating system)
– event tracking (which buttons or ads are clicked for instance)

If you decided to have a free version with specific in-app purchases, or premium version, you can also compare how many paying users to how many free users are using it. You can also learn on a user’s journey through your app: do they always go back to the homepage, or follow deep links and exit? In-app and user behavior are essential to analytics to optimize their experience and see what leads to conversions.

Mobile app analytics will tell you a great deal about the application itself and its performance:
– which pages lead to an app crash
– which device is more likely to make it run slow or crash
– the carrier latency
– the app uptime and downtime,
– the number of errors

A Compuware study showed that 79% of users will retry an app once or twice it fails the first time, a figure that drops to 16% if the app fails more than twice. Same study found out that a poor mobile app experience led to 48% of users less likely to use the app and 34% switching to the competitor’s app! All these figures show how important it is to analyze your performance app analytics in order to diagnose potential problems, troubleshoot what needs to be and identify root causes of issues.  This is key to improve the operational aspect of your app, which can frustrate users and drive them away.

Finally, you can look at rating and review analytics. Today, 88% of users look at reviews before engaging with any business – this is why you are app review are critical to the success of your business. Now, we also know that the overwhelming majority of users don’t leave reviews, and those who take the action to do it is usually to report a bad experience. It is thus important that you communicate your users how important it is to leave a feedback and that such feedback is taken into account to improve the app to their expectations.

You can find a great list of various app KPIs to track in order to perform the best analysis and enhance your application performance. Just like for any analytics, equipping yourself with a reliable business intelligence software will greatly help you in the management and data analysis of your metrics.


Outsourcing App Development? Here’s how!

 App Development

Maybe you have a great idea for a stand-alone app, or that you’ve decided your existing business could use one. Either way, there’s a big difference between having an idea and seeing it through, especially when it comes to mobile apps.

App development is not a simple process. A successful app must perform a useful function, boast appealing design features, and be easy for users to navigate. Understanding these goals is easy; achieving them is not.

If you don’t have much experience in technical design, it’s often smart to outsource your app development project to a web design firm. While you could hire people on a full-time basis, this poses a significant risk: You can’t be completely certain that your app will excite users. If it fails, you’ll be stuck with a department that’s of little use to you, and will cost significant money.

Better to collaborate with professionals who have a track record of delivering quality products to their clients. However, in order to find the right web design firm for your needs–and to ensure that you meet your goals–it’s important to keep certain, key points in mind.

Prepare Thoroughly

When you’re enthusiastic about a new app idea, it’s easy to forget that not everyone will share your vision exactly how you imagine it. You may have detailed plans for how the finished product will look and what it will do, but if you don’t effectively communicate those details to the people actually involved in creating it, there’s a good chance that you’ll wind up with something that misses the mark.

Before meeting with a web design agency, prepare thoroughly. Determine exactly what your app will offer users. If it resembles other popular apps, elaborate on the similarities and how you plan on differentiating.

When you plan to outsource your app development needs, it’s essential that your goals are made clear to the developers. You should also decide whether or not you want the app to be available on iOS, Android, Windows, etc. early on in the process, so you’re not stuck with a team that can’t accommodate your plans.

With the app market as highly competitive as it  is currently, it is best to have your app function across multiple platforms. Try to source a development team that has expertise across more than just iOS, and have them show you how each platform will perform to meet your goals.

Establish Timelines & Communication Procedures

If you don’t know much about developing an app, you probably don’t know how long the process generally takes. Save yourself any confusion be establishing milestones and timelines with the team you hire for the job.

Agree upon communication procedures. Even though you won’t be actively working on the project, it’s still yours, and you should be kept in the loop. Know when and how you can reach out to the vendor for updates.

Using a collaborative, organization software can come in handy here or virtual communication methods (e.g. Skype). Whatever the method you choose, make sure it’s easy for you to communicate with each team member throughout the process, and be able to keep track of development goals.

Stay Involved

When you outsource your app development work to a web design firm, you’re most likely not going to participate on a day-to-day basis. That said, along with project milestone timelines, you should put in place timelines for reviewing and testing the product at various stages in its development. This is necessary to confirm that certain key features work properly before moving forward to the next stage in the process.

During these review sessions, you should be involved, especially as the developers get closer to finishing the work. Sometimes, a potentially groundbreaking app fails because issues or problems got overlooked due to lax review processes. You want the opportunity to address these types of issues early.

Be Understood

Just as  you may not know a lot about app development, it’s also likely that the team you hire doesn’t know a lot about your business. However, if they’re developing an app related to your brand, it’s important that they have a reasonable familiarity with it.

When considering which design agency to hire, pay attention to how clearly they seem to understand your industry. There are a number of ways to do this: You could seek out development teams that have created similar apps before. You can deliver a thorough presentation explaining the field in as much detail as possible. Or you could simply pay attention to the questions they ask when discussing your project; if they’re truly comfortable with your industry, they’ll often ask the types of questions people in that vertical would ask.


Review Previous Work    

When you hire a contractor to paint your house or remodel your kitchen, you look at examples of past work to determine if they’re right for the job. It’s the same with app development.

After you’ve decided upon a list of potential candidates for the project, find out what apps they’ve created in the past and spend some time using them. Ideally, you should find apps that are reasonable similar to the one you’re planning.

Many vendors can tell a good story about their experienced programmers and dedicated approach to customer satisfaction. The ones worth your attention can also supply you with proof that they’ve delivered quality results in the past.

A good place to start are the case studies listed on a developer’s website or profile. Delve into these to really gauge what they’re capable of, and how their past experience can apply to you.

This is an especially important point to remember if you have very little experience or familiarity with the process of developing an app. In order to confirm that your design team understands your thinking and knows how to execute on a concept, it’s useful to test out other apps they’ve developed. This will give you a better idea of how their products work when they’re actually completed.

Outsourcing app development to a software design firm is frequently a better choice than sourcing in-house. In order to get the best results, you need to take the time to properly vet the developers.

Once you have, you also need to remain involved to some degree. While they’ll handle the details, you’re still the one whose vision fueled the project in the first place. With a collaborative approach, you’ll boost your odds of success.


How to Implement App Shortcuts in Android 7.1 Nougat?

Google has released a major update of the 7.1 version (API 25) with some pretty cool features. One of the extra features is App Shortcuts.

What is an App Shortcut?

How to customize your app icons with the Shortcuts app | iMore

App Shortcuts uncover common tasks or activities of your application to the launcher screen. Users can use the App Shortcuts feature by long-press on the app icon. 

  • App Shortcuts are great for making common actions of your app visible and bring back users into the flow in your application.
  • App Shortcuts can be static or dynamic.
    • Static remain same after you define them, you have to redeploy app if you want to make any changes in it.
    • Dynamic one can be changed any time or on the fly.
  • You can create/manage the stack of activities once you open one through a shortcut. Here you can set the flow of all the activities using intents.
  • You can reorder the shortcuts in their respective. Static shortcuts will come always at the bottom as they’re added first (there’s no rank property to be defined on them)
  • The labels are char sequence. So you can play with the span in order to change anything in the text of the labels.

App shortcuts can be of two types-

Static Shortcuts– They are defined statically in a resource file; you can’t change without redeploying the build.

Dynamic Shortcuts– The one that can be defined at runtime or on the fly; you can change without redeploying the build.

Note: App must have a minimum SDK version set to API 25.

Let’s start with creating Static Shortcut first.

Static Shortcuts 

Android Tutorial: App Shortcut Static - YouTube

Open your AndroidManifest.xml and add the following meta-data tag to your parent or main activity which you want to open as soon as your app starts playing the role.

You can add multiple shortcuts in the root tag <shortcuts>. Let’s understand the properties one by one.

  • enabled: It indicates that the shortcut is enabled or not. If you want to disable this shortcut, just set the parameter value as false.
  • icon: It will set the icon to your shortcut menu on the left side.
  • shortcutDisabledMessage: This will show the message if someone will click on the disabled shortcut. However if you have set the “enabled” feature as false, the option will not be shown when you will do long-press but the user can pin a shortcut to the launcher. So pinned shortcut will be disabled at that time and click on it will show a toast message to the user.
  • shortcutLongLabel: The longer text that will be shown as a label but it will only be shown if there is enough room.
  • shortcutShortLabel: A short description of the shortcut. This field is mandatory.
  • intent: The intent will be invoked when the user will click the shortcut icon.

Multiple intents in shortcuts tags will maintain the stack of the activity as you can see in the above example. When you will press the shortcut icon, then “MainActivity” followed by “MyStaticShortcutActivity” will be opened, and when you press the back button it will take you to the “MainActivity”.

Dynamic Shortcuts

Create dynamic wallpaper on iOS without banner notifications - 9to5Mac

The dynamic shortcuts can be modified on the fly without the need of redeploying your app. They are created in java code.

I will show you how you can add dynamic shortcuts. We will use the ShortcutManager and ShortcutBuilder.Info in order to create dynamic shortcuts.

Here we have built the shortcut info using shortcutManager. We can set the properties for the shortcut using it. The properties are the same except id and set rank. So I will explain these two only in case of dynamic shortcuts and other properties have same behavior as static shortcuts.

Here in the above example, we have defined the id shortcut_dynamic as the second parameter of ShortcutInfo.Builder and setRank() are used to set the order of the shortcut which is not present in the case of static shortcuts. Here the first static shortcut will appear followed by rank 0 and then rank 1 shortcut.

As you can see in above image that static shortcut always takes place at the bottom of the list. You cannot change the rank of static shortcuts. They will always be shown in the order they’re defined in the file shortcuts.xml

If we see the method setShortLabel(CharSequence)of ShortcutInfo.Builder we can see that it takes CharSequence as a parameter. Which means that we can play around with it. We can change its color on the fly. We can create a SpannableStringBuilder and set to it a ForegroundColorSpan with the color, we want to apply and then pass the spannableStringBuilder as a shortLabel (as the SpannableStringBuilder is a CharSequence):


Developing App? Here’s Angular Practices & Tips

Angular has been the most famous javascript framework among the developer community. It’s an MVC framework which provides pre-built components for developing the software application.Angular(2+) is based on Typescript , which is a superset of JavaScript. It comes with its most important advantage of static type checking that provides compile-time checking for any variable declarations and definitions.This blog is based around some best practices for Angular which I figured out while developing applications. There are also some bonus tips which I believe would help you with Angular development.

Essentials of mobile app development lifecycle that appreneurs must know - Business of Apps

Major Factors That Authenticate The Use Of AngularJS - Creative Tim's Blog

Follow the component based approach

Angular comes with the component-based paradigm which is also one of its best practices. It helps in maintaining modular and readable code.

While developing an angular code, if you think that something can be used multiple times as an independent piece of code, make it a component. A very basic example can be a simple dropdown which shows a list of options. The drop-down can act as an independent component with its own methods and template.

Few more examples could be – breadcrumbs for navigating throughout our web application, a simple alert box showing error/success messages or a loader. We tend to ignore these while thinking of modular approach but all these above examples can be thought of as independent components which can be reused over and over again.

Avoid using one huge global CSS

Angular’s current structure includes individual folder for every component. This folder includes-

  • .ts file for component logic
  • .html file
  • .css file for the component

So, keeping all of your CSS in one common CSS file would not only make your code less readable, it would make it less maintainable.

The best approach to style your components is to separate the global CSS with the local CSS (here local CSS refers to the component CSS). You should write your CSS in global CSS only when the CSS is written for the entire application and then if you need to style your component specific to a certain page, you can surely write in the local CSS.

Use CSS preprocessors for faster development

We can also use CSS preprocessors like SCSS/SASS for our Angular projects and I prefer them instead of writing plain CSS as they provide a lot of advantages over writing plain CSS. To mention one, the use of partials so that you can also separate your styles into multiple files for maintainability. If you guys want to know about partials, I would suggest you to go through this link.

You can divide your styling into multiple SCSS files just as we divide our application into multiple components. SCSS/SASS helps in writing smaller code which would ultimately get converted into CSS. So, why not save time and use it to our advantage.

CSS preprocessors | PSDtoWP.net

Save your time by using build tools

Tools like angular-cli have come up as a lifesaver for angular developers. It’s basically a boilerplate for an Angular application which helps in quickly setting up the angular application for your new project. It comes with all dependencies required for building your application and also has an inbuilt webpack which helps in bundling all your code and assets. Angular CLI helps to increase developers productivity through scaffolding by creating a component file, template file, stylesheet file etc. It comes with few basic commands which help in faster development like:-

  • ng g component my-new-component – it will create a new component with the name my-new-component.
  • ng g service my-new-service – it will create a new service with the name my-new-service.
  • ng g module my-module  – it will create a new module. A module is basically a collection of components which help to serve or attain a particular functionality.

Use ES6 paradigm and approach

Interfaces in Vanilla ES6 JavaScript – Full-Stack Feed

Though right now ES-8 is the current drafted version for ECMAScript but ES-6 came up with its own new features that are still widely used by developer community as they produce the same results with fewer lines of code and for best practices, every developer should know how to use them.

  • Arrow Function – In javascript, we use this keyword to refer to the current execution context. Previously, when we had to write javascript functions, this keyword would refer to the function context and we had to use a temporary variable to store the current execution context, so that we never lose it but with the arrow functions, the current execution context is never lost. For e.g., we could use an arrow function like this;

// ES5

var sum = function(x, y) { return x + y };

// ES6 (arrow function)

var sum = (x, y) => { return x + y };

Now, see the ES6 arrow function is just so compact and easy to understand and we can easily use this keyword inside this function to refer to the current execution context.

  • Template Literals – Template literals have come up with how we deal with printing strings having dynamic content.

For example, without template literals if we had to print a hello and goodbye message to a person, we would write something like :

const name = ‘AMAL’

console.log(‘Hello ’ + name +’ !’);

console.log(‘Goodbye ‘ + name + ‘ !’);

Now using template literals, it would be something like this:

const name = ‘AMAL’

console.log(`Hello ${name} !`);

console.log(`Goodbye  ${name} !`);

Now, who wouldn’t like to use the second syntax as it’s really easy to use and we don’t have to care about putting the spaces at right places so that the formatted output is correct.

Apart from these, const and let keywords came up as a replacement for global var variable so as to enable effective scoping of variables.

For a detailed overview of ES6 features, I would recommend having a glance over this.

Use Lazy Loading wherever possible

What is Lazy Loading | Lazy vs. Eager Loading | Imperva

Lazy loading is based around loading modules only when you want them to show.

We know about Angular’s modular architecture where a code is divided into modules with each module having its own components.

These components are basically views which might have some dynamic data. These components are rendered with the help of angular routing.

Lazy loading is one of the best things that angular framework comes with.

It’s based around one principle – ‘load/use it when you need it’. Oh, yeah what a lame
explanation I’ve given. There is a routing.ts file in every module which defines a URL for rendering each and every component.

Now when it comes to implementing lazy loading technique, what we do is we define a routing file for each and every module and we import each module only when the URL changes and it corresponds to rendering a component defined in the routing file of that module.

This technique requires a bit of patience to learn but take my words, it’s worth implementing. I can tell you with my personal experience; we reduced the loading time of our website by 3-5 seconds by implementing lazy loading.

Previously, we imported the whole bundle each and every time the user hit our website URL making our site slow while rendering. Then after implementing lazy loading, we only imported the module containing component required to render our index page and we just loaded other modules only based on what URL the user is switching to.

The Angular docs surely cover the lazy loading technique and it’s worth reading. You can check this link to learn more about it.

Follow DRY principle, extensively use services and directives

Services

DRY – This keyword is very famous in the developer community and it just stands for Don’t Repeat Yourself. So, when writing any code- be it Angular or any language- if you feel that you are basically writing or repeating the same code in every component, then you must pause then and there and rethink whether the code can be placed at a suitable place and can be shared by every component.

For example, if you want to call an API that updates user data, don’t call it in every component. What I would do it, I would rather make a service for it in the .service.ts file and would call that function whenever I need any component.

Also, it serves the purpose of using services in angular. Services help us in saving and fetching data and also help us write common functions which could be used by multiple components.

Directives

Now switching over to directives. A directive is a piece of code which is used to perform a specific task. Directives are of 3 types in Angular – component, structure, attribute.

  • Components are as we all know templates with logic to handle data.
  • Structure directives modify DOM by adding or removing an element.
  • Attribute directives change appearance or behavior of an element.

Once, I was wondering to restrict input elements to accept only numbers when a user types in for a phone number field which shouldn’t accept alphabets. For this, I built an only number directive which would only allow input elements to accept numbers through the keycode. So just by using this directive as an attribute on an HTML input element, I can modify/change its behavior.

Conclusion

Following best practice is never a compulsion. There are many ways of doing things and you may choose any path. However, using best practices mean that you are following a method or a technique which is tried and tested through experiments and has proved to be effective to attain desired results.

Mobile App Interface: With UX-UI Strategies

When was the last time you bought a movie ticket from the multiplex counter? When was the last time you went out to Crosswords to buy a new release from your favorite author? Or when was the last time you went out for dinner without reading its reviews on Zomato? And oh! When was the last time you went to bank for checking your monthly statement?Take your time!Ages ago, no?

Life is sorted. Everything is available on mobile apps now. We’re living in revolutionary times. The power that web has given to us is enormous. It has made our life, both, easy and difficult. Every one of us has now access to a plethora of information. A swarm of mobile applications is available on the store to make your life easy. For things as small as which baby stroller to buy, we have become dependent on our mobile devices.

UI/UX Strategies to develop Mobile App Interfaces | Humble Bits

Our eyes and ears are always open to that new cool app which is making waves in the market. And every mobile app which becomes a craze among its users has one reason behind it- excellent User Experience. A lot of people believe that design is about making applications look pretty. Ofcourse, a part of it is true. Anything which looks good improves the user experience. But what if it doesn’t satisfy customer needs?

A good design includes creating each and every interaction to delight users. Remember what Steve Jobs said?

“It’s not just what it looks like and feels like. Design is how it works.”

A bad user experience will give you a thousand thumbs down within minutes. The application must delight its users, both with functionality and experience. The mobile app interface should appeal to the users. I am sure you can relate to the experience when the mobile application works perfectly but doesn’t excite user to use it? What if the application looks pretty but its functionalities are broken? In these cases, you need to look at what works for users and what doesn’t.

Well, there is no one-size-fits-all solution. But here are some strategies that you can implement which have always worked wonders-

Design long-lasting products

7 Winning Design Tips and Strategies For App UI/UX Developers - iqonic

The argument to stay up-to-date with all the latest trends might clash with this but when we say design long-lasting products, we mean that the products should not age prematurely. The product should not become out of style with time. Design something neutral, which can live longer and is not just a passing design fad.

Dieter Rams, a very famed industrial designer, says-

You cannot understand good design if you do not understand people; design is made for people.

He conceived these 10 design principles fifty years ago. He says he didn’t intend these principles to be set in stone forever. If you read them, you will understand why these didn’t mutate with time. They are still accepted and implemented till date. So your design should follow the latest design trends, but do it while keeping in mind your end user.

Keep It Simple, Stupid!

Less is More– this famous proverbial phrase emphasizes on why you should keep things simple and clear. The idea is that simplicity and clarity in thoughts lead to good design. When you are designing, take instances from your real life. How do you like to keep your stuff at home? Clean and organized? Use that thought in your design. Move away from clutter.

Every element in your design should serve a purpose. It shouldn’t just sit there as a pretty object. Minimalism is a tricky thing. Offer your user space where they can find action buttons easily. Reduce the load of information, keep navigation flow easy and let the user win. So, even if you are designing a web page to sell potato or onions, don’t make the user think!

The large clear fonts set the message straight- loud and clear. The background color places the user’s mind into the right frame of mind. The CTA buttons allow users to move directly to the action. Minimalism does not mean you start removing elements from the design, it’s about removing the unnecessary and keeping just enough which can depict your story.

Make an impressive user-onboarding flow

Follow these 7 steps for creating a bulletproof UI/ UX strategy

A lot many people uninstall apps they just downloaded when their onboarding experience is ruined. If you ask for too many permissions (camera, Gallery, contacts, location) then the user might become irritated. Collect only relevant information which is usable for you. Give your user flexibility to log in from different platforms- Facebook, Twitter, being two very popular options.

After you have made the user signup successfully, offer him a quick tour of what is the app about- where are the profile settings, where is the action button, which features are available and where. Even here, provide an option to ‘Skip’.

Use appropriate colors to make a connection

According to the color theory, if we apply logic to the selection of colors, it can greatly enhance our user experience. In visual experiences, colors should be pleasing to the eye. Anything which is pleasing increases engagement of the viewer and encourages him/her to get involved. On the other hand, when something is not pleasing to the eye, it is either dull or chaotic.

If the visual experience is boring and dull, then the monotonic appearance will keep user disengaged. The human mind will not perceive that information effectively. On other extremes, if the use of colors is overdone, it becomes chaotic. So much so that the user cannot comprehend the motive.

So color harmony which delivers visual interest to the user and a sense of structure is essential. And that is why it is important to create emotions with colors in UX Design.

Make Navigation Simple

Gps Navigation designs, themes, templates and downloadable graphic elements on Dribbble

You can have a pretty website with colorful and stylish design and astonishing images, but it pains my heart to say that it will be an utter failure if users don’t make any purchase from it. Simple and intuitive navigation helps them take an action. Every step should guide them to a result and help them understand trivial things, like:-What brand they are looking at
-What is the particular page about
-Where can they find the menu
-How can they get back to the previous page or next page
-Is there a way they can apply filters or search a particular product
-How can they make a purchase
-From where can they contact a concerned person
-How can they give feedback or suggestions

All this is vital and needs to be designed with utmost care because if user is made to waste time on these crucial things then they will immediately switch to a better option.
The digital era is here to make our experience faster & more convenient as compared to real life experiences. Make it worthwhile!

Conclusion

Just as a well dressed and a well-mannered person will always attract attention; similarly a mobile app interface with good design which solves users’ problems will always attract user’s attention. The most important thing which you need to keep in mind is to make sure that your design is both useful and intuitive. The world of app development is bursting and it will continue to grow by leaps and bounds. You, my friend, must learn to create an outstanding user interface that makes your mobile application amazing.

Developing App the Native way, Hybrid or Highway?

Smartphones have become an invaluable part of human existence, and their impact on society is only going to increase as the industry undergoes rapid and groundbreaking innovation. In this era of mobile app dominance, various cutting edge technologies have been introduced to keep pace with the demands of consumers and make the development process more efficient. Mobile app developers have the option to create either Native or Hybrid mobile apps, based on their preference. Each of these technologies has its pros and cons, and it is up to the developer to decide which way to go with the app development. Platforms like Squareboat are excellent mobile and web development services providers, which provide both Native and Hybrid app development services.

Native vs Hybrid App Development

There are a few key differences between Native and Hybrid app development:

Underlying Technology

Underlying Technologies XML Is the Glue Program the Web XML Browse the Web HTML T C P/IP Connect the Web Technology Innovation ConnectivityPresentation. - ppt download

There is a vast difference in the way Native and Hybrid apps work behind the scenes. Native apps are specifically created for a particular target platform, using a specific programming language along with the dedicated SDK and toolkit. As an, e.g., for native Android app development, Java is used to develop the app using the SDK and toolkit provided by Google. Native apps have full access to the native APIs and all the device’s sensors like gyroscope, accelerometer, camera, GPS, and more.

Hybrid apps are a mixture of both Native and Web apps. It is essentially a web app enclosed in a native app container called Web View. Hybrid apps are created by using web technologies like HTML, CSS, and JavaScript, among other tools. As they are enclosed in a native shell, they can be downloaded and added to the home screen, just like native apps. Hybrid apps have moderate access to devices’ features.

Platforms Supported

All about using Applozic on your preferred platforms - Applozic Blog

Native apps, as the name suggests, are native to the target platform for which the app is created. Hence they can only run on a single platform. So a Native Android app can only run on the Android devices, and a native iOS app can only run on iOS devices.

Hybrid apps can run on multiple platforms like Android, iOS, and Windows mobile, as they are built using platform-independent web technologies. Hybrid apps are enclosed inside a native shell which can connect with devices’ sensors, just like a native app.

Performance and Stability

Performance Testing - Testing for Speed, Stability, and Scalability - TestLodge Blog

Native apps set the benchmark in terms of performance as they are built specifically for the target platform. They have shorter response times and lag less often. Hence Native apps provide a better overall user experience than hybrid apps. Native apps also have an added stability factor as they are usually backed by giant corporations like Google and Apple, which means that the platform is supported for a long time in the future with regular bug fixes and updates. Native apps also have well-defined guidelines for the developers to follow in terms of how the app should look and feel. Thus making the job of app developers much easier and also increases the security, as developers can refer to the security guidelines laid down by Apple of Google.

Hybrid apps are relatively slower than native apps as they add a layer between the source code and the mobile target platform. They usually have longer launch times and more crashes when compared to native apps. The user interface also might feel sluggish if the app involves vast amounts of data manipulations. Advanced animations and effects could be slower as the app runs inside the webview container. Web technologies are advancing at a rapid pace, and hence, hybrid apps, which depend on web technologies, are also inching closer and closer to the native apps in terms of performance. The stability and security of hybrid apps depend on the best practices followed by the app developers as there is a lack of clear guidelines, and also on the type of framework being used to create the hybrid app. E.g., a framework like Ionic adds multiple layers on top of HTML and JavaScript, and breaking changes in any of these layers can cause severe bugs in the app.

Development Time and Cost

Rapid Custom eLearning Development - The Cost & Time Element

Native apps are comparatively harder to create as they require the developer to learn full-featured programming languages like Java or Swift in addition to other tools. Native apps are built on sophisticated IDEs (Integrated Development Environment) with advanced features for compilation and debugging. Therefore, the app developer has to learn multiple technologies that are much more complex when compared to the hybrid apps, which in turn increases development time and cost, as it becomes equally costly to hire a native app developer.

Hybrid apps are built using web technologies, which are relatively easier to learn, which means that Hybrid apps have shorter development time. It is also relatively cheaper to hire a hybrid app developer.

Native vs Hybrid App Development: Head to Head Comparison

Let’s summarize the differences between Native and Hybrid apps in a tabular form:

Native Apps Hybrid Apps
Performance Very fast Slower compared to Native apps
Platforms supported Only the target platform is supported Supports multiple platforms like Android, iOS, Windows mobile, etc.
User experience Provides better user experience due to low response times and fewer bugs User experience might suffer if the app is dealing with huge traffic or complex calculations or animations
Stability More stable as they are backed by big corporations like Google and Apple. Relatively less stable as they need the support of third party platforms, and thus increases the chances of breaking changes and bugs in the code
Development time Required more time to develop the app for each platform Required less time to develop the app as a single code base can be used to create an app for multiple platforms
Development cost More expensive to hire a developer and maintain the app for multiple platforms Less expensive to hire a developer and maintain the app

Conclusion

Even though Native apps are faster and more stable than Hybrid apps, for most of the scenarios choosing a Hybrid app is a better decision. If the app is dealing with not a very high amount of web traffic and complex animations, then there will not be a noticeable difference in the performance of a Hybrid and a Native app. Also, it is much faster to start development on a Hybrid app and produce the final product, as compared to a Native app. If you need to deploy the app on multiple platforms and cost is a limiting factor, then  Hybrid apps are a great option to go with.

Native apps are best suited if the app is going to serve a lot of people on the web, or if the app will have complex animations and effects. In those cases, a Native app will provide the best user experience as there will be less lag and possible bugs compared to a Hybrid app. So, if you need the best performance, and time and cost are not a limiting factor, then going with Naive is a better option.

Working with SQL Server Azure: Read and Know

As a new version of SQL Server is under preview these days i.e. 2016 Preview and soon will be out for use. It might be possible that you would be wondering why SQL Server @Azure and how it’s different than traditional on-premises Server.

Those who have already gone through the process of purchase, downloading, and installation can understand the pain caused by it.

So here it is with

–          No license purchasing

–          No worry about new release

–          No long hours of installation

–          No need of latest compatible operating system

–          No worry about disaster recovery

–          No worry about availability and scalability

And the list goes on…..

Visit Azure portal get an account, create your server in the blink of eyes and start digging into it.

Let’s create a SQL Database @Azure…

  1. Login to Azure portal [if don’t have a subscription please get one, don’t worry its free for one month which is good enough to enjoy the benefits of cloud and make an informed decision]
  2. Create a Database and a Server for it
  • New > Data Services > SQL Database > Quick Create
  • Provide a name for Database
  • Choose a Server [if it’s your first DB then select “New SQL database server” else choose one from the drop down list]
  • So if you choose to create a new database server you will get some more cool options to choose from such as
    • Provide the Region [yeah these are the location which Microsoft has got its data centers]
    • Login Name for server
    • Password for Login
    • Click on “Create SQL Database”

Hey look it’s there under “SQL Databases” option on the left menu

  Get your connection string

  • Select Database from Database List
  • Click on “Dashboard”
  • Click on “Show Connection String”

4.       Start consuming it from you application using any of technology you love

error: Content is protected !!