UX Designer vs UI Designer vs Web Designer

What Does a UI/UX Designer Do?

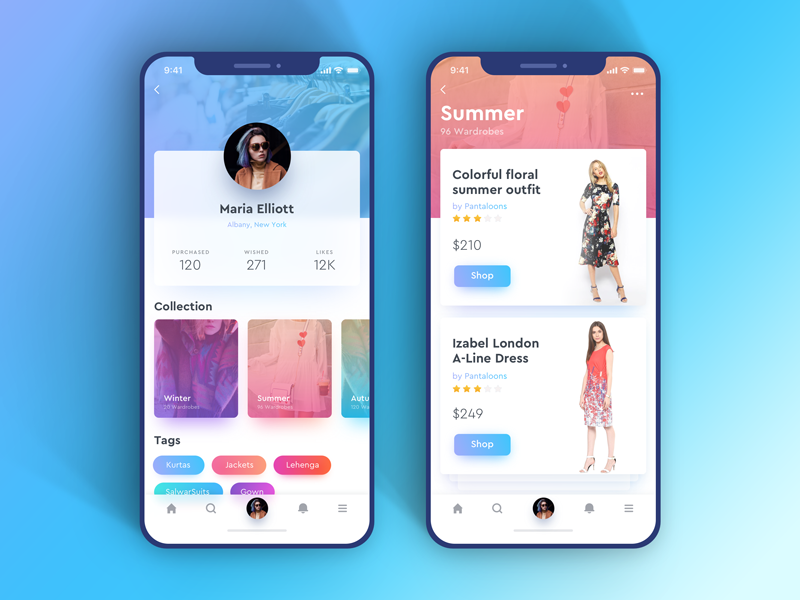
To the laymen, digital design can be a puzzling world of systems, acronyms, and programs. Web creation is not just about making a landing page and adding content anymore but a complex world of coding for site function and protection. It is also a fun and artistic adventure to create something visually alluring. If you combine this with the psychology behind all the systems of a webpage, and you have the basics of web development. Sounds simple enough, right? Not for everyone. The software industry has skyrocketed, and many people are still trying to understand key differences in standard terms. Terms like UI design, web design, and UX design are often thrown around and are incorrectly interchanged. However, following the aim of each tool is as simple as knowing the various parts of a house. Web design is the base or the foundation, UI design is the architecture, and the UX design is the electric, plumbing, and other wiring needed.  Before we get into defining these terms, we can say there can be a lot of overlap between them. UX, UI, and Web Designer difference is nothing but a fine line but can have great impacts on your project. However, to excel in any of them, you must have a comprehensive knowledge of all three of them.

UX, UI, and Web Designer differences:

35,084 Ux Design Illustrations & Clip Art

Web Designer UX Designer UI Designer
A web designer is a professional who generates content for a website following the latest trends. They are responsible for designing the layout of the website, along with its aesthetics, utility, and functionality. UX is the abbreviation for User Experience. It brings in creativity. A UX designer handles the whole procedure of obtaining and coordinating a product, including parts of marking, development, convenience, and utility. It is a process that starts before the product reaches the customer. UI stands for User Experience. A UI Designer is responsible for creating the interfaces between the user and the product and ensure that the interaction between the customer and the product is a seamless one.
The role of the web designer is to compile everything, including the UI and UX, and turn it into a highly-functional and efficient website that people can easily interact with using their smartphones or computers. A web designer might emphasize more of the aesthetics of the site rather than how a user might deal with it. UX design is all about having a deep understanding of the customer, which includes their preferences, behaviors, habits, requirements, and feelings. UX designers must comprehensively understand the issue along with the client whom they are working for so as to design an optimal and streamlined solution. The UI design is the complement of UX Design. UI designers work on the point of interaction between the user and the service/device and try to improvise the product in a way that is user-friendly and adds value to the users. UI designers work on the look, design, and especially the feel of the product.
A web designer must have in-depth knowledge of programming languages like HTML and CSS, Scripting languages like JavaScript and PHP, web designing packages like Flash, Photoshop, etc. A good UX designer is expected to have fluent communication, agile and lean development skills, rapid prototyping, revising skills, crowdsourced designing, and relevant soft skills. In contrary to UX designers, UI designers are in charge of making UX designers’ dreams a reality. Numerous UI designers have a decent comprehension of front-end development along with some coding abilities.
Contemporary Web designers are usually modern era graphic designers trained in visual design to be experts in:

  • Color theory
  • Creative conceptualization
  • Diagrams
  • Interactivity, rollovers, drop-down menus, digital slideshows, call-to-action-buttons, and forms.
  • Icon development
  • Info-graphics
  • Typography
A UX Designer plays a very crucial role in an organization. They have to make sure that a customer is having a good time with the brand. They primarily focus on:

  • Understanding user psychology
  • Comprehending product specification
  • Finalizing the right interaction model
  • Create personas through user surveys
  • Collaborate with UI designers to create attractive and useful designs
A UI designer primarily focuses on:

• Color and typeface choices.

• Designing the monotonous but necessary stuff: buttons, icons, sliders, and scrollbars.

• Forming a style guide for the app or website to ensure consistency for the user.

• Responsive designing

• The interactive parts

•  The layout of each screen

Website designers might be visual designers or engineers who have built enough aptitudes to make beautiful and aesthetic websites or applications. Website designers do not tend to adopt the human-focused strategy of UX design. Most website designers don’t dive as deep to consider every element that a UX designer remembers. A website designer will, in general, be less iterative, while UX design is tied in with coordinating persistent enhancements by interacting with users. UX applies to whatever that can be experienced—be it a site, a cup of tea, or a visit to the supermarket. The “client experience” part alludes to the connection between the client and service or product. UX structure, at that point, considers all the various components that shape this experience. A UX designer considers how the experience makes the client feel and how simple it is for the client to achieve their ideal errands. UI design is simply a digital approach. It considers all the visual, intuitive components of a product interface—including buttons, symbols, checkboxes, typography, color scheme, and responsive design. The objective of UI design is to outwardly guide the client through an item’s interface. It’s tied in with making an intuitive encounter that doesn’t require the user to think excessively! UI design delivers the brand’s qualities and visual resources for a product’s interface, ensuring the design is predictable, intelligible, and tastefully satisfying.

CONCLUSION

So a UX designer chooses how the UI functions while the UI designer chooses how the UI looks, and the web designer puts it all together into a cutting-edge website. This is a community-oriented procedure, and these three domains will, in general, work intently together. While the UX group is working on the flow of the application, how buttons guide you through your website, and how the interface effectively presents the data that the client’s need, the UI group is chipping away at how these interface components will show up on the screen and the web designers are integrating it all.

If Web Design is the umbrella, then UX and UI design are specialties and focuses on it. Anyone who regards themselves as a web designer should be well-versed in UX and UI. These terms are also industry-specific. Startups and tech companies mostly hire specifically for UI/UX roles. Every so often, a UX role will focus more on research and information architecture. Occasionally, a UI role will include UX. Sometimes, companies are looking for a web designer who can do it all. It’s all a bit of a mess unless the aim is precise. Whichever direction you take, it’s vital to remember that design is not just about making things look pretty, but it’s about problem-solving communication and people.

Mobile App Interface: With UX-UI Strategies

When was the last time you bought a movie ticket from the multiplex counter? When was the last time you went out to Crosswords to buy a new release from your favorite author? Or when was the last time you went out for dinner without reading its reviews on Zomato? And oh! When was the last time you went to bank for checking your monthly statement?Take your time!Ages ago, no?

Life is sorted. Everything is available on mobile apps now. We’re living in revolutionary times. The power that web has given to us is enormous. It has made our life, both, easy and difficult. Every one of us has now access to a plethora of information. A swarm of mobile applications is available on the store to make your life easy. For things as small as which baby stroller to buy, we have become dependent on our mobile devices.

UI/UX Strategies to develop Mobile App Interfaces | Humble Bits

Our eyes and ears are always open to that new cool app which is making waves in the market. And every mobile app which becomes a craze among its users has one reason behind it- excellent User Experience. A lot of people believe that design is about making applications look pretty. Ofcourse, a part of it is true. Anything which looks good improves the user experience. But what if it doesn’t satisfy customer needs?

A good design includes creating each and every interaction to delight users. Remember what Steve Jobs said?

“It’s not just what it looks like and feels like. Design is how it works.”

A bad user experience will give you a thousand thumbs down within minutes. The application must delight its users, both with functionality and experience. The mobile app interface should appeal to the users. I am sure you can relate to the experience when the mobile application works perfectly but doesn’t excite user to use it? What if the application looks pretty but its functionalities are broken? In these cases, you need to look at what works for users and what doesn’t.

Well, there is no one-size-fits-all solution. But here are some strategies that you can implement which have always worked wonders-

Design long-lasting products

7 Winning Design Tips and Strategies For App UI/UX Developers - iqonic

The argument to stay up-to-date with all the latest trends might clash with this but when we say design long-lasting products, we mean that the products should not age prematurely. The product should not become out of style with time. Design something neutral, which can live longer and is not just a passing design fad.

Dieter Rams, a very famed industrial designer, says-

You cannot understand good design if you do not understand people; design is made for people.

He conceived these 10 design principles fifty years ago. He says he didn’t intend these principles to be set in stone forever. If you read them, you will understand why these didn’t mutate with time. They are still accepted and implemented till date. So your design should follow the latest design trends, but do it while keeping in mind your end user.

Keep It Simple, Stupid!

Less is More– this famous proverbial phrase emphasizes on why you should keep things simple and clear. The idea is that simplicity and clarity in thoughts lead to good design. When you are designing, take instances from your real life. How do you like to keep your stuff at home? Clean and organized? Use that thought in your design. Move away from clutter.

Every element in your design should serve a purpose. It shouldn’t just sit there as a pretty object. Minimalism is a tricky thing. Offer your user space where they can find action buttons easily. Reduce the load of information, keep navigation flow easy and let the user win. So, even if you are designing a web page to sell potato or onions, don’t make the user think!

The large clear fonts set the message straight- loud and clear. The background color places the user’s mind into the right frame of mind. The CTA buttons allow users to move directly to the action. Minimalism does not mean you start removing elements from the design, it’s about removing the unnecessary and keeping just enough which can depict your story.

Make an impressive user-onboarding flow

Follow these 7 steps for creating a bulletproof UI/ UX strategy

A lot many people uninstall apps they just downloaded when their onboarding experience is ruined. If you ask for too many permissions (camera, Gallery, contacts, location) then the user might become irritated. Collect only relevant information which is usable for you. Give your user flexibility to log in from different platforms- Facebook, Twitter, being two very popular options.

After you have made the user signup successfully, offer him a quick tour of what is the app about- where are the profile settings, where is the action button, which features are available and where. Even here, provide an option to ‘Skip’.

Use appropriate colors to make a connection

According to the color theory, if we apply logic to the selection of colors, it can greatly enhance our user experience. In visual experiences, colors should be pleasing to the eye. Anything which is pleasing increases engagement of the viewer and encourages him/her to get involved. On the other hand, when something is not pleasing to the eye, it is either dull or chaotic.

If the visual experience is boring and dull, then the monotonic appearance will keep user disengaged. The human mind will not perceive that information effectively. On other extremes, if the use of colors is overdone, it becomes chaotic. So much so that the user cannot comprehend the motive.

So color harmony which delivers visual interest to the user and a sense of structure is essential. And that is why it is important to create emotions with colors in UX Design.

Make Navigation Simple

Gps Navigation designs, themes, templates and downloadable graphic elements on Dribbble

You can have a pretty website with colorful and stylish design and astonishing images, but it pains my heart to say that it will be an utter failure if users don’t make any purchase from it. Simple and intuitive navigation helps them take an action. Every step should guide them to a result and help them understand trivial things, like:-What brand they are looking at
-What is the particular page about
-Where can they find the menu
-How can they get back to the previous page or next page
-Is there a way they can apply filters or search a particular product
-How can they make a purchase
-From where can they contact a concerned person
-How can they give feedback or suggestions

All this is vital and needs to be designed with utmost care because if user is made to waste time on these crucial things then they will immediately switch to a better option.
The digital era is here to make our experience faster & more convenient as compared to real life experiences. Make it worthwhile!

Conclusion

Just as a well dressed and a well-mannered person will always attract attention; similarly a mobile app interface with good design which solves users’ problems will always attract user’s attention. The most important thing which you need to keep in mind is to make sure that your design is both useful and intuitive. The world of app development is bursting and it will continue to grow by leaps and bounds. You, my friend, must learn to create an outstanding user interface that makes your mobile application amazing.

Browser specific hacks for Frontend developers

If you are a web developer then it’s unlikely that you haven’t faced this situation-You spent days and weeks writing perfect code. Everything is perfect from the CSS stylesheet to the meta tags. You test it in Google Chrome and it works perfectly fine. You go home and sleep in peace. But when you come back to the office the next day, everything is broken and you find a hundred bugs allocated in your name.Browser specific hacks for Frontend developers | Humble Bits


Culprit? Internet Explorer.

And, Mozilla Firefox.

And, Opera.

Happens to all of us, right?

So, is there a way out of this mess? Well, there isn’t. At least not a full proof one. 100% cross-browser compatibility is a myth. It’s almost impossible to write a code which works perfectly fine in all the internet browsers. It comes with experience and you need a lot of patience to learn that craft.

But you can always start small. I learned some browser specific hacks during my journey and I thought it’s a good idea to share them with fellow developers.

Browser Specific CSS Hacks | W3REIGN

Implementation

It is as simple as you write your simple CSS code, just pick the hack you want. Copy it into your stylesheet. Add the style you want between the braces. Enjoy the new styles for the browser that you’ve targeted!

Google Chrome and Safari Browsers

Google Chrome and Safari browsers are mainly the same as they both use WebKit, but sometimes they behave differently in the case of forms, fonts etc.

Css hacks

@media screen and (-webkit-min-device-pixel-ratio:0){

.selector{

property:Value;

}

}

Media Query Hacks

@media all and (-webkit-min-device-pixel-ratio:0) and (min-resolution: 1280px){

.selector {}

}

Javascript hacks

var isChrome = !!window.chrome && !!window.chrome.webstore; // for Google chrome

var isWebkit = ‘WebkitAppearance’ in document.documentElement.style; // for Chrome and Safari

Firefox (any version)

Css hacks

@-moz-document url-prefix() {

.selector { Property: Value; }

}

Media Query Hacks

@media all and (min–moz-device-pixel-ratio:0) and (min-resolution: 1280px) {

.selector { Property: Value; }

}

Javascript hacks

var isFF = ‘MozAppearance’ in document.documentElement.style;

Opera – Opera 10 and above

Css hacks

@media not all and (-webkit-min-device-pixel-ratio:0) {

.selector { Property: Value; }

}

Media Query Hacks

@media all and(-webkit-min-device-pixel-ratio:0)and(min-resolution: 1280px){

.selector {

Property: Value;

}

}

Javascript hacks

var isOpera = window.opera && window.opera.version() == X;  //replace x y the version

Internet Explorer

Css hacks

:root .selector {

Property: Value\9; color: red\9;

}

Conditional Comments

<!–[if IE 9]> Internet Explorer 9 <![endif]–>

<!–[if lte IE 9]> Internet Explorer 9 or less <![endif]–>

<!–[if gte IE 9]> Internet Explorer 9 or greater <![endif]—>

For example:

<!–[if IE 9]>

<link rel=”stylesheet” type=”text/css” href=”all-ie-only.css” />

<![endif]–>

IE 10 and above

_:-ms-lang(x), .selector { property:value; }

@media screen and (-ms-high-contrast: none), (-ms-high-contrast: active) {

.ie10up {property: value;}

}

@media all and (-ms-high-contrast: none), (-ms-high-contrast: active) {

.ie10up {property: value;}

}

IE 11 and above

_:-ms-fullscreen, :root .ie11up { property:value; }//Works for IE 11 and above

*::-ms-backdrop, :root .selector { property:value; }//Works for IE 11

IE 11+, Microsoft Edge Browser

/* Put this code in external stylesheet: ie11up.css */

@charset “&lt;Any Modern Browser but MSIE 10- or FF 18- &gt;”;  _:-ms-lang(x), .selector { property:value; }

Javascript hacks

var isIE = ‘behavior’ in document.documentElement.style && ‘- ms-user-select’ in document.documentElement.style;

var isIE = window.navigator.msPointerEnabled;

var isIE = document.body.style.msTouchAction !== undefined;

MeteorJS

What is MeteorJS?

What is MeteorJS? | Guide to What is MeteorJS with Career Scope

MeteorJS is a javascript framework to create web applications. It is built on the top of NodeJS and uses MongoDB as a storage layer.

Components of Meteor

There are 5 major components on which MeteorJS is built upon.

How does ddp work in meteor? - Quora

BlazeUI

Blaze UI | Tracxn

This library of MeteorJS is helpful to give live updates to users. This library is responsible for updating DOM. It is just like AngularJS where in DOM you have to just tell what you want and if there is any update, it will take care of that.

MongoDB

Thousands of MongoDB databases compromised and held to ransom – Naked Security

Meteor project comes with MongoDB, without writing any configuration file. It can be accessed from the remote by adding 2 in the Meteor server port. For instance, if Meteor is running at 3000 then MongoDB will run at 3002 port. The MongoDB files are in the .meteor directory of the Meteor project.

DDP

Distributed Data Protocol(DDP), is a communication layer between client and server. It is based on web sockets. Everything that happens between client and server is only through DDP. The client and server do not know each other. Client and server both don’t need to be of Meteor. Meteor clients can talk to other servers who understand DDP and Meteor servers can talk to other clients who understand DDP.

Live Query

It is a communication layer between and server and database. It continuously listens to the database and sends updates to the server if anything happens in the database. So if anything happens in the database, you will get updated results on the screen without hitting the refresh button. In general, it requires a separate implementation for each database.

Benefits of Meteor

1. You can get real-time updates without writing an extra code for it.
2. Packaging system – You can save lots of time by using MeteorJS packages. Many built-in packages can be used as it is. Using packages and writing your package for others is also very easy. Rails developers can think of a gem as a package.
3. Learning curve is low. You need to have command over javascript because MeteorJS uses javascript on both the client and server-side.
4. Meteor itself minified the javascript and CSS in production mode.
5. Meteor automatically syncs the state between client and server.
6. The community of Meteor is very active and supportive.

An Example

Below are the few commands that will install MeteorJS and then it will create the project for authentication.

Installation

$ curl https://install.meteor.com/ | sh

To create an application with name authentication

meteor create authentication

The output of the above command will be-

Run Application

Go to authentication directory – cd authentication

Type command – meteor
Open the browser and go to http://localhost:3000
By executing the above commands you will see something

Add package

meteor add accounts-base
meteor add accounts-password
meteor add accounts-ui

The above 3 commands will add authentication packages

Display buttons on UI
Add below line in authentication.html and comment {{> hello}} line

{{> loginButtons}}

The above line will give you the ‘Sign in’ link on your browser and when you click on that link you will get ‘Sign in Form’ and other links that are required for authentication


Software Metrics for your Product Development

Developing a quality software product falls under the realm of software engineering. The ever changing user requirements and harsh project timelines pave way for cost overruns or delays in the delivery schedule. So, bigger the scope of your project, more complex the functionality becomes. With so many factors it is very easy to lose control over the quality processes to develop an excellent product. We know that no engineering is complete without accurate measurements; which further brings us to the point that all measurements are done by applying certain metrics.For this reason we need software metrics for transparent and quality delivery of the product. Because when you measure what you speak about, you have numbers to express your failure or success. You have a calculated expression which shows you where you lacked and places you stood well. In Bob Parsons’ words-‘Anything that is measured and watched, improves.

Software Metrics to Improve Development: What and How to Track

Now the question arises- which software metrics to use?

One option is to pick a set of predefined metrics. The other one is you can first define the product requirements, discuss with the various stakeholders and then set the required metrics.

For a better understanding, consider an analogy when you are backpacking for an adventure activity. Would you pack a parachute if you are going for kayaking?


Absolutely not.


Instead, you would first decide upon the adventure sport, do a bit of research and accordingly pack your adventure gear. So, if you are going for paragliding, pack your bag with a helmet and a harness.

You can leave the oars behind for the next time.

Defying the law of gravity? It’s okay. But make sure you don’t cause more harm than good in the project. For this reason, it is important to apply the right metrics at the right stage in the product development cycle. As a software development company which builds engaging products.

1. Team Velocity Points

In simple words, team velocity measures the average speed of your team towards achieving its goal during one sprint. The fact that a typical sprint goes on for about 2-4 weeks, calculation of team velocity points proves to be a valid metric to gather the team’s efficiency.

If you want to calculate your team’s velocity, sum up the story points that were completed during that Sprint. To decide the team’s velocity, a three sprint’s average is usually considered.

Why? It’s an industry standard and it determines the project’s pace at which the functionality is being developed. In simple terms, it tracks the velocity of a Scrum team over time. This metric helps in deciding whether the team can take up more work over time or is the team already overloaded and it need to be reduced.

2. Sprint Burndown

What is Burndown Chart in Scrum?

Sprint burndown chart is the most effective tracking metric to visualize the health of the project. It helps in reviewing how much work is pending and if the team needs to speed up or slow down. You can also predict the expected completion date of the sprint. A deviation from the expected burndown will send a red flag to the scrum master to take appropriate actions.

For instance, if burndown goes up at any point during the sprint, it reflects an addition to the existing scope. At this time, it’s important for a team to achieve ‘team’s goal’ first before fetching new items from the backlog.

Why? The Burndown chart indicates the progress of work within a sprint. It shows whether amount of work a team is accomplishing every day will lead to a successful sprint completion or not.

3. Release Burnup

How to Create a Release Burn-Up Chart — Rob Frohman

Product owners need to evaluate what should be out in the market first based on their discussions with other stakeholders. Release Burnup helps POs to continuously prioritize product backlog based on how the work is progressing.

If the release date is fixed and there has been a few additions to the initial scope, this is an important metric to align scope with the actual release date by either removing low priority backlog items or attempting to increase velocity by taking suitable measures.

Why? The Release Burnup chart indicates whether the sprints are progressing towards a successful project completion in terms of functionality achieved. Also, gives us a projected date of completion of the project.

4. Estimated Cost vs Actual Cost at Completion

Often there are gaps between the estimated cost projection during the start of the project and the actual cost at completion of the project. This metric gives a measurement of what deviations could have led to this difference in the cost.

Although, almost always the project cost goes higher than the expectation (just like we tend to overspend while shopping), this metric helps you understand what could be the possible cause of cost overrun- be it some design error or some changes in the scope of product development.

Why? Helps us understand what cost we had estimated and what cost was incurred. This helps us in improving our planning.

5. Number of major bugs per sprint

The number is an indicator of the overall quality of the product. When you are working in an agile project, it becomes important to put a budget i.e. count on the number of major defects open in a project at any point of time.

How can we stay within the budget? Reduce the count of defects reported.

How can we reduce the number of defects? Do Not Report!

Yes, I’m kidding.

Here is a better solution- focus at the time of planning, look-ahead and clearly define acceptance criteria before jumping on a sprint backlog item.

The priority of resolving any major bug is over and above implementing any new feature. Because if you can’t resolve what your did wrong, you can not pick a new feature.

At the same time, keep a close watch at the number of bugs reported after production release. If you have not been proactive in refactoring and improving quality of your code, chances are you will receive nasty numbers in this metric. This will help you to identify gaps in testing and take corrective measures

Importance of Usability Testing

When Lyla was asked if she could interview an author on her colleague’s behalf, she jumped at the opportunity. Lyla was interning with an uptown magazine for a role that deemed her ‘unfit’ for any important tasks such as interviewing a popular author. Getting an opportunity to talk to her favorite author was like a jackpot. She thought she is finally gripping onto a childhood dream. She thought she finally can brag about meeting Paula Hawkins. She wanted to be careful about not screwing this golden opportunity, so she double-checked everything on her list.
Notepad, check. Pen, check. Camera, check. Questions, check. Recorder, check! Oh wait! I have to check for a new update, just in case I am outdated.
Which Usability Testing Method Should I Use in 2021? | PlaybookUX

She updated her app quickly and reached the coffee shop before time. She was excited, she was anxious. It’s an easy-peasy task, you just have to ask questions, record them and pour it out later– she kept repeating this in her mind.
But the moment Paula Hawkins walked in, she started feeling the breathlessness. Part excited, part nervous, she could feel her palms sweating. After exchanging some pleasantries they kicked off with the interview.

“Shall we start?”
“Yes, of course. Let me just..umm… Start this thing”
*she clicked on the record button and started talking, simultaneously taking notes.*

Unaware of what was happening after she clicked on that little red button, she went on with the interview, taking down notes as per her whims. Ignorant of the new updated feature — which now needed ‘long press and hold to start recording’, she finished the interview, smiling and pleased with herself. But as she looked down, in order to ‘STOP’ the recorder, she lost the fanatic feel of doing a good job!

A little hover over the button said “long press and hold to start recording” which was an obvious slip.
Game over. She probably lost her mind or her job. Or both. But that’s none of our concern. Right? She should have been more attentive.

Lyla is a fake person. She did not meet Paula Hawkins ever. But the incident is real. Only, it happened with an acquaintance and I figured out it wouldn’t be fair to name her. This incident forced me to shine some light on the importance of usability testing and why it’s more important to pay attention to user’s behavior while they interact with the product.

They say, never talk to your users, they hardly know what they want. But they missed out on the summary-

“To design the best UX, pay attention to what users do, not what they say. Self-reported claims are unreliable, as are user speculations about future behavior. Users do not know what they want.”

Usability testing- What is it?

What is usability testing? - Quora

Usability testing is like black-box testing of an application to ascertain if the product built is convenient to use and easy to learn.

These are methods of testing and observing the behavior of the users to find out what works and what doesn’t work. Users are given specific tasks to complete and when they are at work, observers watch their body language, facial expressions, emotions and encourage them to “think aloud” i.e. speak up whatever comes to their mind while using the product. Doing this exercise we can get qualitative and quantitative data and figure out usability issues with a product.

So, why usability testing is important?

Website Usability Testing: How To Get Started Today | Hotjar Blog

Doing usability testing the right way, at right time with the right set of people reduces the risk of building the wrong product; thereby saving time, money and other precious resources. In other words, if done at an early stage when the product is at paper prototyping stage, it finds the problems when they are easy and cheap to fix. And when done on a product which has attained maturity it helps to understand user’s success rate and time spent to complete a task. There are hundreds and thousands of cases when usability testing proved to be a good exercise in terms of ROI.

For example, a slight tweak in design suggested by usability testing for Mac’s UI, the company got 90% fewer support calls.

Need more clarity about why usability testing is a good idea? Here you go-
#1. To check if product meet user’s expectations
#2. Matches business decisions to real-world use
#3. Removes flaws in the product
#4. Allows you to see how successful users are with their tasks
#5. Useful for getting user reactions and feedback about the product

What are the types of data that we can get as a result of our analysis?

Two types of data results received are — quantitative and qualitative. Usability testing is largely a qualitative research technique and is not driven by statistics like surveys where lots of people participate. Usability testing is done using a small set of people, usually five to seven.

Qualitative methods are very useful to test the stress response of the users like their body language, movement of hands, expressions on the face and squinting eyes especially doing a test on a mobile device.

The metrics we get after usability testing can be quantitative as well. For example, time spent on doing a task, success and failure rates and also the efforts, like how many clicks a user needs in order to complete a task.

Is there a need to record all the metrics obtained from a usability testing?

Yes, keeping a record of the metrics is very important. Why? Because usability testing is not just for designers to understand how to make better designs but it is also an important tool to influence the rest of the stakeholders like clients, their sales/support team, project managers, developers, other designers etc.

Every stakeholder involved may have a different point of view for a design decision. Being subjective by nature, design decision often leads to long debates among stakeholders. Most often design decisions are influenced by a person who holds the highest position among fellow stakeholder or has superior oratory skills.

In short, metrics help us in iterating and validating design concepts. It gives objectivity to design debates and it helps in taking fact-based design decisions.

At what phase of the design process usability testing is recommended?

When it comes to usability testing there are two terms often referred by big names of the UX industry (like Jacob Nielsen) and these terms are Summative Test and Formative Test.

These tests are done at different stages of the design process. They are as explained below:
Formative tests are low-fidelity tests (to gain quick insights)-
#1. During the very initial development phase using paper prototypes
#2. It can be done anywhere and a formal lab is not required
#3. It can be done just between a moderator and a participant

The results from a formative test may include-
#a. Users’ comments in the form of “Thinking Aloud” narrative i.e. their emotions, confusion sources and their reasons for actions.

Summative tests are high fidelity tests (to capture metrics)-
#1. These are carried out at the end of the development stage
#2. At this stage usability of a product is validated
#3. This gives an answer to the question “How usable the product is?”
#4. This gives a comparison against competitor products
#5. Conducted in usability labs or remotely using many tools available where users can do the test using their computers or mobile phones

The results from summative tests may include-
#a. User’s success rate to achieve a goal
#b. The time spent on completing a task

How many users are required to conduct the testing?

“Elaborate usability tests are a waste of resources. The best results come from testing no more than 5 users and running as many small tests you can afford”
Jacob Nielsen

“It is widely assumed that 5 participants suffice for usability testing. In this study, 60 users were tested and random sets of 5 or more were sampled from the whole, to demonstrate the risks of using only 5 participants and the benefits of using more. Some of the randomly selected sets of 5 participants found 99% of the problems; other sets found only 55%. With 10 users, the lowest percentage of problems revealed by any one set was increased to 80%, and with 20 users, to 95%.”
Laura Faulkner

Who among them is right?

It depends on what type of test we are doing and where we are doing it. For example, if we are doing a low-fidelity formative testing we can do away with a small sample size. But if we are doing a summative testing we need a bigger sample size. In the type of testing where we are comparing our site to competitor’s website by using an online tool which is cheap and fast, we can use a large sample size. But we should keep in mind that these online tools like UserTesting or Loop11, they don’t capture metrics. It’s us who has to be aware of how all the participants did it.

So how to prepare a test plan?

That is certainly a good question. You have an inquisitive mind, I must say. But don’t you think that will be too much to digest in one bite?
Still, if you are really into it, give these things a thought-
-Decide what areas to concentrate on
-Determine potential usability issues
-Determine what tasks you want to test

Pace up The Gradle Builds

It’s been some time since Google I/O 2017 was released and there are lots of new things for Android developers. We all have to suffer from the Gradle build speed issue. Sometimes it takes ages to build an APK. But in this I/O session, Google team presented some cool tips on how you can speed up your Gradle builds and it looks promising. After listening to the complete session, I decided to extract some cool tips for your reference.
How to fix build.gradle error while using " classpath 'com.android.tools. build:gradle:2.3.3' " - Stack Overflow

1. Always use the latest Gradle plugin for Android

The tool team is working hard to improve the performance of the Gradle plugin for Android, so it’s better to check the latest build and always keep updating.

2. Don’t use legacy MultiDex

If you are using legacy MultiDex in a device having a lower Android version, then it can impact your app performance. Always try to use the latest version of MultiDex so that it can be supported by all Android versions without impacting the performance of the app.

3. Turn Off multi-build APK

If you are in development phase, then it would be better to disable this as it slows down build time.

You can also set this using Android Studio. For this, open Preferences -> Build, Execution, Deployment -> Compiler settings in Android Studio and add -PdevBuild to the Command-line options.

4. Use only required resources

Resources occupy some space while generating APK file and also impact the build time. If you are in development phase, then let Gradle know to only take care of the required resources. Also, you can set the preference of the device for which you are developing the application.

5. Turn off PNG grinding

PNG optimization is not necessary for the development builds so you can turn it off, as by default it is on. It will definitely speed up the build time.

6. Give Instant Run a try

There is a bad reputation of the instant run, but when it works, it works like a charm. The tooling team has worked on it and now in Android 3.0, it is more stable as compared to earlier versions. So you can give it a try and speed up the build performance.

7. Avoid using dynamic dependencies

Using dynamic dependency version causes Gradle to check for the new version in every 24 hours. So it’s highly recommended not to use the dynamic dependency.

8. Always take care of memory

You should keep your eyes on how much memory you are giving to the Gradle. You can watch this video to know more on Gradle memory setting and Dex in the process.

9. Turn on Gradle caching

Gradle caching is introduced in Gradle version 3.5. It reuses the outputs from the previous build. It can work across the projects and gives a high performance when used with Android Studio 3.0. So let’s give it a try as well.

10. Disable Crashlytics plugin

We generally add crashlytics plugin in Android Studio to find the cause of the issue/crash, but it slows down the build time as it generates new ID every time we generate a build. It’s better to disable this in development builds using below-mentioned code snippet.

Avoid those security vulnerabilities in your iOS

Every program is a potential target for hackers. They would want to tear you down and make you kneel. So, what do we do? I think we should stop writing programs and put our laptop lids down?Naah…. Just kidding!!Attackers will try to find security vulnerabilities in your application. They will then try to use these vulnerabilities to steal secrets, corrupt programs and data. Your customers’ private information and your reputation are at stake.

Security is not something that can be added to software as an afterthought; just as a shed made out of cardboard cannot be made secure by adding a padlock to the door, an insecure tool or application may require extensive redesign to secure it. You must identify the nature of the threats to your app and incorporate secure coding practices throughout the planning and development of your product.

Five weak spots of iOS app security and how to address them - DEV Community

Secure coding is the practice of writing programs that are resistant to attack by malicious or mischievous people or programs. Secure coding helps protect a user’s data from theft or corruption.

Most software security vulnerabilities fall into one of these small set of categories:

  • Buffer overflows
  • Unvalidated input
  • Race conditions
  • Access-control problems
  • Weaknesses in authentication, authorization, or cryptographic practices

I am not going to bore you with the theory of each type of vulnerability here. Duhh!! Who does that nowadays??

Instead, I am going to share a few examples from my own experience which I came across while going through an enterprise based security scan of my code.

Observation 1- Buffer Overflow

Abstract- The program writes outside the bounds of allocated memory, which could corrupt data, crash the program, or lead to the execution of malicious code.

As you can see in line 2 of the method, variable ‘has_storage’ has been declared as an unsigned 32 bit integer and assigned a value. However in line 3, a value is assigned to some index value of it. This is the classic example of possibility of Buffer overflow.

How Buffer Overflow Attacks Work | Netsparker

This code snippet is a part of Google’s Firebase/Messaging pods framework.

Fix

Avoid declaring the variables by keeping such vulnerabilities in mind i.e you can define this as:-

uint32_t  _has_storage_[0];

Observation 2- Privacy Violation: HTTP GET

Abstract- The identified call uses the HTTP GET instead of POST method to send data to the server.

Explanation- HTTP requests which utilize the GET method allow the URL and request parameters to be cached in the browser’s URL cache, intermediary proxies, and server logs. This could expose sensitive information to individuals who do not have appropriate rights to the data.

Example 1: The following code makes an HTTP request using the GET HTTP method instead of POST.


let url = URL(string: “https://www.somesvr.com/someapp/user”)
let request = NSMutableURLRequest(URL: url!)
request.HTTPMethod = “GET”
let connection = NSURLConnection(request:request, delegate:self)

Example 2: If the application uses NSURLRequest then the default HTTP method is GET.

let url = URL(string: “https://www.somesvr.com/someapp/user”)
let request = URLRequest(URL: url!)
let connection = NSURLConnection(request:request, delegate:self)

Since most of us are not aware that while making a URLRequest in Swift, if we do not provide any HTTP method then the default method is “GET” which can be treated as a major vulnerability in many of the Static Code Analyzers.

Fix

Make an extension of the URLRequest class and add a method with some added parameters as per your convenience.

Observation 3- Insecure Storage: HTTP Response Cache Leak

Abstract- The identified method performs a URL request without configuring the URL loading system to prevent the caching of HTTP(S) responses.

Explanation- The HTTP(S) responses may contain sensitive data such as session cookies and API tokens. The URL loading system will cache all the HTTP(S) responses for performance reasons, storing them unencrypted in the {app ID}/Library/Caches/com.mycompany.myapp/Cache.db* files. Developers may think that by setting the diskCapacity or memoryCapacity properties of the URLCache class to 0, they may be effectively disabling the HTTP(S) response cache system. However, the NSURLCache documentation states that both the on-disk and in-memory caches will be truncated to the configured sizes only if the device runs low on memory or disk space. Both settings are meant to be used by the system to free system resources and improve performance, not as a security control.

Fix

The combination of two solutions works best for plumbing these types of leaks. Firstly, after the response has been received, remove all the cache that has been saved to the memory by using this small snippet

Observation 4- Insecure Transport: Weak SSL Protocol

Abstract- The SSLv2, SSLv23, and SSLv3 protocols contain several flaws that make them insecure, so they should not be used to transmit sensitive data.

Explanation- The Transport Layer Security (TLS) and Secure Sockets Layer (SSL) protocols provide a protection mechanism to ensure the authenticity, confidentiality and integrity of data transmitted between a client and web server. Both TLS and SSL have undergone revisions resulting in periodic version updates. Each new revision was designed to address the security weaknesses discovered in the previous versions. Use of an insecure version of TLS/SSL will weaken the strength of the data protection and could allow an attacker to compromise, steal, or modify sensitive information.

Weak versions of TLS/SSL may exhibit one or more of the following properties:

– No protection against man-in-the-middle attacks
– Same key used for authentication and encryption
– Weak message authentication control
– No protection against TCP connection closing

The presence of these properties may allow an attacker to intercept, modify, or tamper with sensitive data.

Example 1: The following example configures the session to use SSL v3.0:

Fix

In most of the networking libraries that we use in iOS like Alamofire and AFNetworking, the default setting is to use SSL Protocol and hence if we explicitly update the minimum supported protocol in our code to the latest TLS protocol version, then we can easily prevent this vulnerability in our code.

Observation 5- Input Interception: Keyboard Extensions Allowed

Abstract- The application allows third party keyboard extensions to be allowed.

Explanation- Keyboard extensions are allowed to read every single keystroke that a user enters. Third-party keyboards are normally used to ease the text input or to add additional emoticons and they may log what the user enters or even send it to a remote server for processing. Malicious keyboards can also be distributed to act as a key-logger and read every key entered by the user in order to steal sensitive data such as credentials or credit card numbers.

Fix

If you want that no third party keyboard can be installed while using your application, then add this code snippet into your AppDelegate.swift file.

Observation 6- Insecure Storage: Lacking Data Protection

Abstract-  The identified method writes data to a file lacking sufficient encryption settings.

Explanation- Even though all files on an iOS device, including those without an explicitly assigned Data Protection class, are stored in an encrypted form; we can specify NSFileProtectionNone which results in encryption using a key derived solely based on the device’s UID. This leaves such files accessible any time the device is powered on, including when locked with a passcode or when booting. As such, usages of NSFileProtectionNone should be carefully reviewed to determine if further protection with a stricter Data Protection class is warranted.

In the following example, the given data is not protected (accessible anytime the device is powered on):

Fix

-NSFileProtectionCompleteNSDataWritingOptions.DataWritingFileProtectionComplete:
The resource is stored in an encrypted format on disk and cannot be read from, or written to, while the device is locked or booting. It’s available in iOS 4.0 and later.

-NSFileProtectionCompleteUnlessOpenNSDataWritingOptions.DataWritingFileProtectionCompleteUnlessOpen:
The resource is stored in an encrypted format on disk. Resources can be created while the device is locked, but once closed, cannot be opened again until the device is unlocked. If the resource is opened when unlocked, you may continue to access the resource normally, even if the user locks the device.
Available in iOS 5.0 and later.

-NSFileProtectionCompleteUntilFirstUserAuthentication, NSDataWritingOptions.DataWritingFileProtectionCompleteUntilFirstUserAuthentication:
The resource is stored in an encrypted format on disk and cannot be accessed until after the device has booted. After the user unlocks the device for the first time, your app can access the resource and continue to access it even if the user subsequently locks the device.
Available in iOS 5.0 and later.

-NSFileProtectionNoneNSDataWritingOptions.DataWritingFileProtectionNone:
The resource has no special protections associated with it. It can be read from, or written to, at any time.
Available in iOS 4.0 and later.

Oh!! My God… So many observations. Who writes such a vulnerable code anyway??

Me, you??

Let me tell you something folks! Privacy and Security are two important constructs of today’s digital umbrella which covers a huge part of our society. And moving forward we are going to be more dependent on all these digital devices lying around us exploiting the technologies like AR, AI, IoT etc. Did I just sound like Mr. Snowden?? Believe me, I am “No One”(pun intended).

But, it’s the least, we as developers can do to make our code less prone, a little bit more secure by keeping in mind certain techniques while coding. After all, good code is contagious. It spreads.

Learn: Using DiffUtil with Recycler View Adapter

What is DiffUtil?

A utility class that finds the difference between two lists and provides the updated list as an output. We can use this utility class to notify updates to a RecyclerView Adapter.

When the content of our list gets changed, we have to call notifyDataSetChanged for getting the updates but it is very costly. There are so many iterations for getting the job done in the case of notifyDataSetChanged.

As of 24.2.0, RecyclerView Support Library, the v7 package offers a utility class called DiffUtil. It does its job perfectly. It is based on Eugene Myers’ algorithm.

GitHub - mohsenmbcom/android-diffutil-recyclerview-example: A complex example of using DiffUtil with RecyclerView

Comparison with notifyDataSetChanged

If you know the implementation of RecyclerView you may also know that below mentioned method will be required to notify the changes to the adapter.

  • notifyItemChanged
  • notifyItemInserted
  • notifyItemRemoved

And their corresponding Range variations

  • notifyItemRangeChanged
  • notifyItemRangeInserted
  • notifyItemRangeRemoved

Their names explain their purpose pretty well. According to the official documentation, they are significantly more efficient than the famous notifyDataSetChanged(). DiffUtil uses these methods to notify the RecyclerView for any changes in the data set

Let’s take a scenario, where we are using some filtration on data. Here we will sort data according to the rating.

DataRepository.class

DiffUtil.Callback is an abstract class that has both abstract and non-abstract methods in it. Let’s take a look at the adapter and callback class first.

RatingAdapter.class

Let’s understand the RatingDiffCallback.class methods.

getOldListSize()– This method will return the size of the old list.

getNewListSize() This method will return the size of the new list.

areItemsTheSame(int oldItemPosition, int newItemPosition)– This callback method decides whether two objects are representing same items or not.

areContentsTheSame(int oldItemPosition, int newItemPosition)– This callback method decides that two items have same data or not. This method will only be called if the return type is true.

getChangePayload(int oldItemPosition, int newItemPosition)– If areItemTheSame returns true and areContentsTheSame returns false DiffUtil utility calls this method to get a payload about the change.

It is recommended that for a large amount of data in the list, you should do the calculation part in a background thread as it may throw an ANR exception.

Why use DiffUtil?

Here is the performance chart which illustrates that using DiffUtil is better in a case of RecyclerView. These results are based on Nexus 5X with M-

  • 100 items and 10 modifications: avg: 0.39 ms, median: 0.35 ms
  • 100 items and 100 modifications: 3.82 ms, median: 3.75 ms
  • 100 items and 100 modifications without moves: 2.09 ms, median: 2.06 ms
  • 1000 items and 50 modifications: avg: 4.67 ms, median: 4.59 ms
  • 1000 items and 50 modifications without moves: avg: 3.59 ms, median: 3.50 ms
  • 1000 items and 200 modifications: 27.07 ms, median: 26.92 ms
  • 1000 items and 200 modifications without moves: 13.54 ms, median: 13.36 ms

Due to implementation constraints, the max size of the list can be 2^26.

Conclusion

DiffUtil utility class finds the difference between the provided old and new lists and dispatches the updates to the adapter.

CSS3 Flexbox

There are many techniques to vertically center elements but all have looked some or the other way, quite hacky as developers have always been looking for an elegant solution to accomplish vertical centering.Ironically, people say CSS is easy but things like doing vertical centering has always made developers go crazy to find one elegant solution to the above problem in contrast to what they need to do for horizontal centering. Thank god, there is flexbox which has lessened the woes of developers.

What is the Flexible Box?

The flexible box layout is an alternative to grid layout in which there is no media query for particular breakpoints. Instead, it’s all about accommodating elements at a limit till which you can accommodate elements and then break it.

Flexible box gives more power and freedom to layout the structure. The child elements inside a parent container can be stacked vertically or horizontally by a difference of only one line of code. Isn’t it cool?

Responsive Web Design Using Flexbox – TA Digital Labs

Flexbox layout helps developers in building responsive layouts with less of a worry about stacking things on different viewports and centering of things. Flexbox gives power to developers to lay out content as they want to be with minimal code. For e.g. if a developer wants 2 divs (i.e. A and B) to be horizontally stacked as A and B but vertically stacked as B and A. So, he/she just has to write:

-webkit-flex-direction: column-reverse;
flex-direction: column-reverse;

It’s that simple. Isn’t it cool?

A Glance through flexbox properties

Taking .wrapper as default parent class and .wrapper-list-items as its children

1) Display

Display property of Flexbox is used to tell the browser on how to layout the parent container in the flow of document of web page.
There are two possible display values: flex and inline-flex.

The only difference between the two values is that display:flex makes the parent element behave as if it has display:block property i.e. occupying full width of the web page and display:inline-flex makes the parent container to behave as if it is an inline element.

Display property is used for parent container on which we want to apply flex property and the actual layout is carried out on its child elements.

Code-
//the parent container
.wrapper {
display: flex || inline-flex;
}

2) Flex Direction

Basically, “horizontal” and “vertical” isn’t what the directions are called when we deal with flex.
These are described as main-axis and cross axis. By default, the flex-direction property is set to row and it aligns the flex-item(s) along the main axis.

/*where wrapper represents a flex container*/
.wrapper {
flex-direction: row || column || row-reverse || column-reverse;
}

The flex items are then laid across the main-axis, stacking horizontally from left to right. If the flex-direction property is changed to column, the flex-items would be aligned along the cross axis i.e. top to bottom.

3) Flex-wrap

This property defines whether the child elements should break if there isn’t enough space to accommodate all the child elements and if it’s allowed by making it wrap, then we could also change the direction in which the child elements should wrap.

//where .wrapper represents a flex container
.wrapper {
flex-wrap: wrap || nowrap || wrap-reverse;
}

“Wrap” is a fancy word to say. In simple words, when the available space within the flex-container can no longer house the flex-items in their default widths, it breaks into multiple lines.

4) Flex-flow

The flex-flow is a shorthand property which takes flex-direction and Flex-wrap values.

//wrapper is parent-container
.wrapper {
flex-flow: row wrap; /*direction “row” and wrap the children i.e wrapper-items.*/
}

5) Justify-content

Flexbox | Online Productivity Solutions Pvt. Ltd.

It defines the alignment of the child elements along the main axis of the parent container. It equally distributes space among the child elements if all the child elements don’t occupy 100% space along the main axis of parent container.

The justify content property defines how flex items are laid out on the main axis.

Justify content has 5 values to work upon:-

//wrapper is parent-container
.wrapper {
justify-content: flex-start / flex-end / center / space-between / space-around
}

6) Align-items

This property defines how Flexbox items are aligned according to the cross axis, within a line of a flexbox container. So, if the flex-direction is row by default so the cross axis is perpendicular to the row.
Align-items can take any of the below 5 values:

1) align-items: flex-start; – The Flexbox items are aligned at the start of the cross axis.
2) align-items: flex-end; – The Flexbox items are aligned at the end of the cross axis.
3) align-items: center; – The Flexbox items are aligned at the center of the cross axis.
4) align-items: baseline; – The Flexbox items are aligned at the baseline of the cross axis.
5) align-items: stretch; – The Flexbox items will stretch across the whole cross axis.

Code:
//wrapper is parent-container
.wrapper {
align-items: flex-start || flex-end || center || baseline || stretch
}

So, above are some of the basic properties of Flexbox that I’ve covered which will atleast give you a head-start of Flexbox.

But as the saying goes – ‘With great power, comes great responsibility’, we should have a clear mindset as to when to use Flexbox for our layouts.

Here are some complexities related to using Flexbox-

Don’t use Flexbox for page layout. Flexbox is more powerful for laying out structure of components but not for a full web application. For laying out the structure of the page, it’s still a better practice to use grid system and then we could use Flexible box to layout components and their child elements.

Flexbox has come to make our lives easier, not difficult. We know it’s easy to layout elements inside a flex container but we shouldn’t overuse it if it could be done in more simpler ways. For example- to center text inside a span, we shouldn’t go for flex layout as there are much simpler ways to do it. So why complicate simple things?
Don’t use Flexbox if you need to support older browsers like IE-8 or IE-9 as support for Flexbox is present only on IE-11 and above. So, backward compatibility is a big issue for Flexbox.

error: Content is protected !!